
How to develop an AI softphone in C#
How to register to a PBX and answer calls with Whisper, AI, and Text-to-Speech
 |
Download: | AI_softphone.zip |
This example demonstrates how to build a console-based AI softphone by using Ozeki VoIP SIP SDK in C#. The application registers to a PBX, answers incoming calls automatically, detects speech from the remote caller, transcribes the speech with Whisper, sends the recognized text to an AI model, then converts the AI response to speech and plays it back into the call.
The referenced Ozeki tutorial page organizes the content as a step-by-step learning document with setup, registration, object descriptions, and source code analysis, so this page follows the same documentation pattern.
Why do we need AI Softphone?
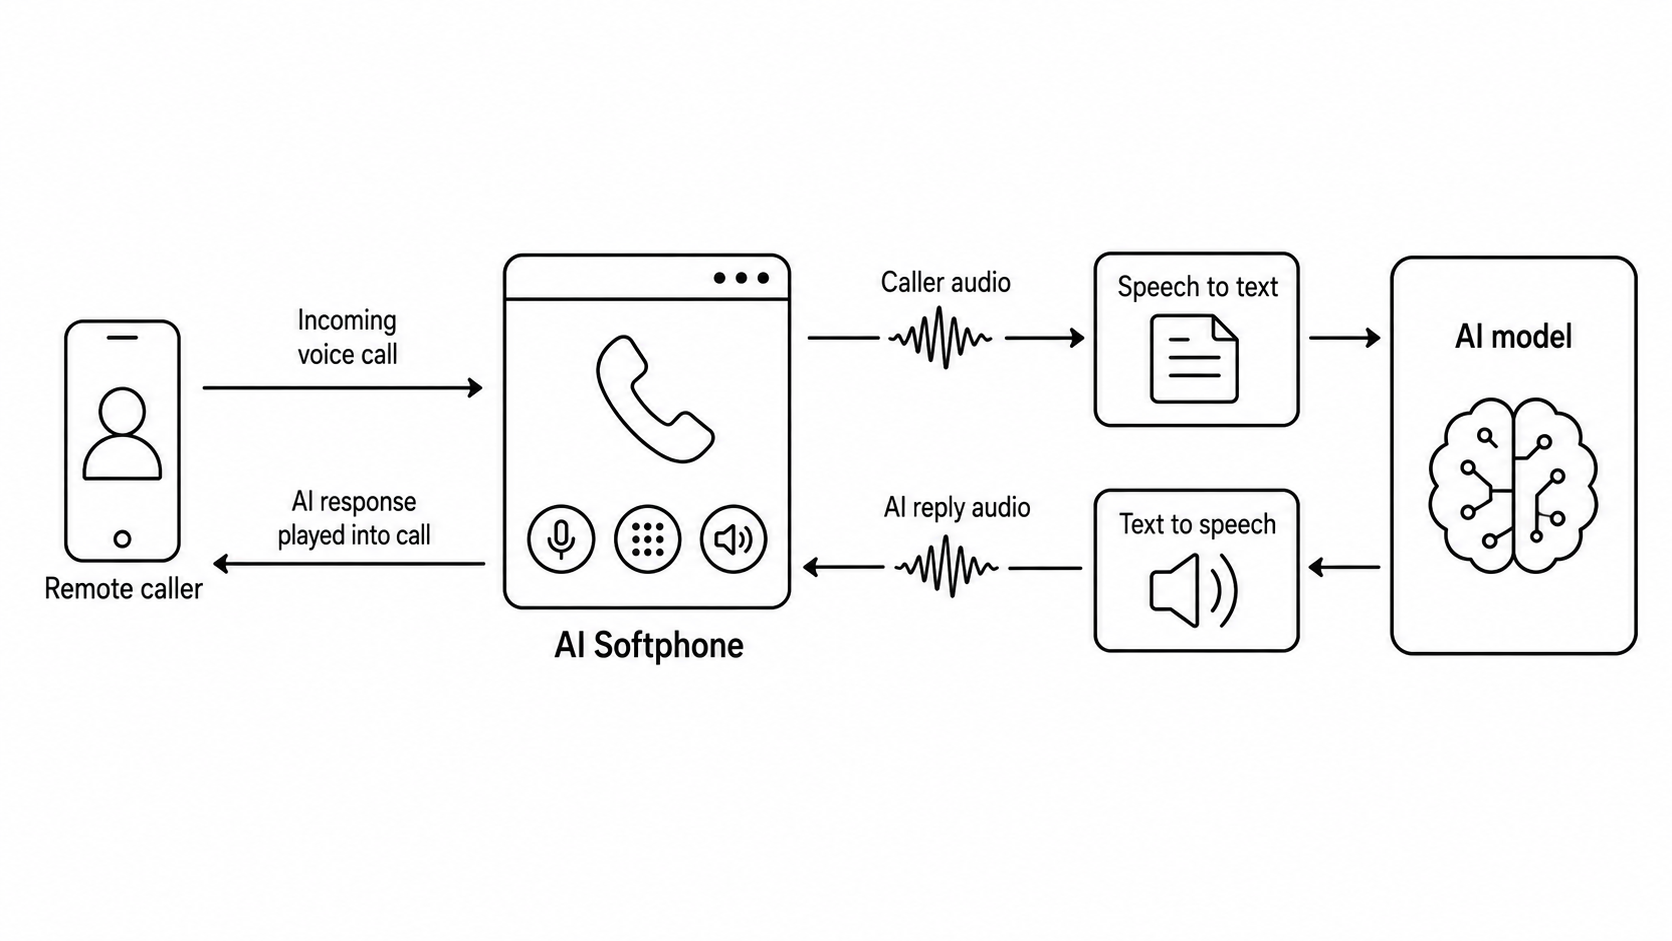
An AI softphone is needed to turn traditional SIP calls into intelligent, fully automated conversations that can understand natural speech and respond in real time without a human agent. By combining speech‑to‑text (Whisper), an AI chat model (such as Gemma), and text‑to‑speech, it can transcribe what the caller says, generate a meaningful answer, and play it back as voice during the call. This makes it possible to build scalable 24/7 phone assistants that handle routine inquiries, authenticate callers, and integrate with back‑end systems while freeing human operators for complex tasks.
How does it work
This application acts like an automated phone assistant. After a caller speaks, the software records the utterance, sends it to a speech-to-text engine, forwards the transcribed text to an AI model, and returns the generated answer back to the caller as synthesized speech.
This extends the simple PBX registration scenario shown on the reference page into a complete voice AI call flow built on top of SIP registration and incoming call handling.
How to build your solution
To reproduce this solution, create a new Console Application in Visual Studio, add a reference to the Ozeki VoIP SIP SDK, and place the example logic into your main source file. The original Ozeki tutorial also starts with creating a console application and adding the required SDK reference before explaining the code in detail.
How to test the solution
To test the AI softphone solution, first register the softphone to your PBX with valid SIP credentials and place a test call from another extension or device. During the call, speak several utterances and verify that each one is recorded, sent to Whisper for transcription, forwarded to the AI endpoint, and then returned as synthesized speech into the call without errors. Use tools such as Wireshark and application logs to confirm that HTTP requests to Whisper and the AI model are successful, and adjust VAD thresholds or timeouts if utterances are cut off or not detected reliably.
Key source code section
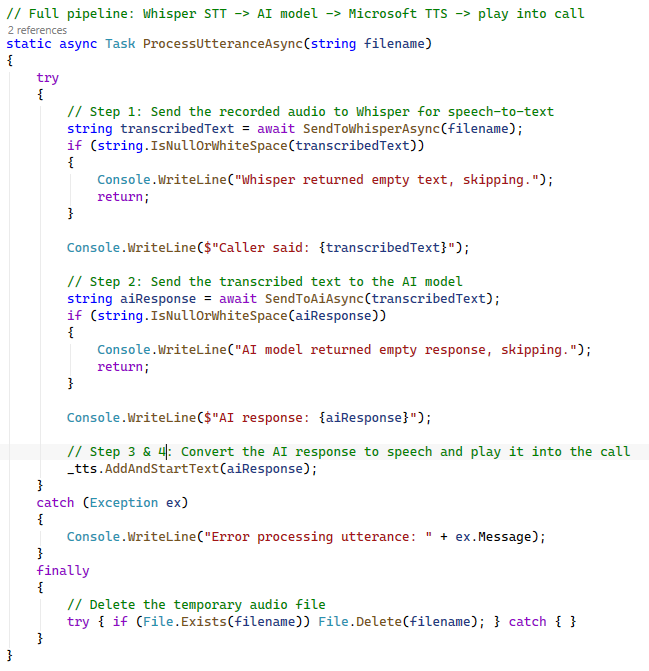
This code section implements the main AI pipeline in a single asynchronous method, ProcessUtteranceAsync, which is called after each utterance is recorded to a temporary WAV file. It first posts the WAV file to the Whisper HTTP endpoint and, if non‑empty text is returned, sends that transcription to the AI chat completion endpoint to obtain a reply string. Finally, it feeds the AI response text into the Microsoft Speech Platform TextToSpeech engine for playback into the SIP call, while a try/finally block guarantees that the temporary audio file is deleted even if an exception occurs.
// Full pipeline: Whisper STT -> AI model -> Microsoft TTS -> play into call
static async Task ProcessUtteranceAsync(string filename)
{
    try
    {
        // Step 1: Send the recorded audio to Whisper for speech-to-text
        string transcribedText = await SendToWhisperAsync(filename);
        if (string.IsNullOrWhiteSpace(transcribedText))
        {
            Console.WriteLine("Whisper returned empty text, skipping.");
            return;
        }

        Console.WriteLine($"Caller said: {transcribedText}");

        // Step 2: Send the transcribed text to the AI model
        string aiResponse = await SendToAiAsync(transcribedText);
        if (string.IsNullOrWhiteSpace(aiResponse))
        {
            Console.WriteLine("AI model returned empty response, skipping.");
            return;
        }

        Console.WriteLine($"AI response: {aiResponse}");

        // Step 3 & 4: Convert the AI response to speech and play it into the call
        _tts.AddAndStartText(aiResponse);
    }
    catch (Exception ex)
    {
        Console.WriteLine("Error processing utterance: " + ex.Message);
    }
    finally
    {
        // Delete the temporary audio file
        try { if (File.Exists(filename)) File.Delete(filename); } catch { }
    }
}
How to register to a PBX
As described on the Ozeki tutorial page, communication starts by creating a SIP account object and then creating a phone line from it. After that, the line is registered on the softphone, which sends the SIP REGISTER request when registration is required.
| Setting | Example value | Description |
|---|---|---|
| RegistrationRequired | true |
Required for receiving incoming calls. |
| DisplayName | 1001 |
Name displayed to other SIP endpoints. |
| UserName | 1001 |
SIP username or extension number. |
| AuthenticationId | 1001 |
PBX login identifier. |
| RegisterPassword | 1001 |
Password used during SIP registration. |
| DomainHost | 192.168.0.173 |
PBX IP address or host name. |
| DomainPort | 5060 |
SIP listening port of the PBX. |
Source code section
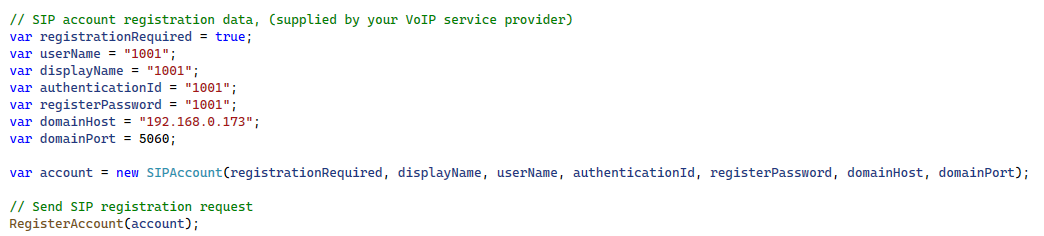
// SIP account registration data, (supplied by your VoIP service provider)
var registrationRequired = true;
var userName = "1001";
var displayName = "1001";
var authenticationId = "1001";
var registerPassword = "1001";
var domainHost = "192.168.0.173";
var domainPort = 5060;

var account = new SIPAccount(registrationRequired, displayName, userName, authenticationId, registerPassword, domainHost, domainPort);

// Send SIP registration request
RegisterAccount(account);
Whisper HTTP communication in Wireshark
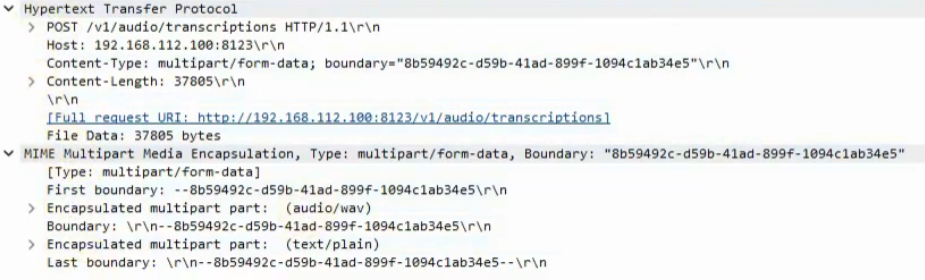
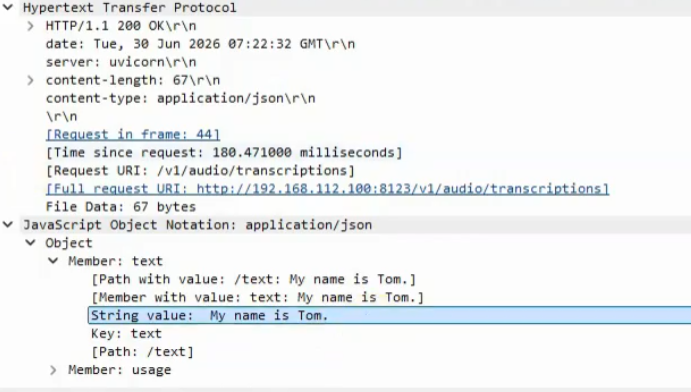
To check the Whisper HTTP communication in Wireshark, start a capture on the network interface used by the softphone, then place a test call so the application sends audio to the Whisper endpoint. Apply a display filter such as ip.addr == 192.168.0.100 && tcp.port == 8123 (or filter to the http protocol) to isolate the transcription traffic. Inspect the captured HTTP POST requests to confirm that each WAV file is uploaded as multipart/form-data and that the server responds with a JSON payload containing the transcription text.
Why do we need SIP Registration in a VoIP Softphone?
A PBX needs to know exactly where to send a call before it can deliver one. Phones don't have a fixed, permanent location on the network: they can be assigned a different IP address each time they connect, move between networks, or simply be switched off. SIP registration solves this by having each phone periodically tell the PBX "this is who I am, and this is where you can currently reach me." Without this step, the PBX would have no reliable way of finding a phone, and incoming calls to that extension would have nowhere to go.
External service configuration
| Component | Configured value | Purpose |
|---|---|---|
| Whisper URL | http://192.168.0.100:8123/v1/audio/transcriptions |
Speech-to-text endpoint. |
| Whisper Model | whisper-large-v3 |
Transcription model. |
| AI URL | http://192.168.0.100:10000/v1/chat/completions |
OpenAI-compatible chat completion endpoint. |
| AI Model | Gemma-4-26B |
Language model used to generate the spoken answer. |
What is a Whisper HTTP Request PDU
A Whisper HTTP Request PDU is the HTTP message that the softphone sends to the Whisper server, carrying the recorded WAV file and model name as a multipart/form-data POST request. It contains the request line, headers such as content type and content length, and the binary audio body that Whisper will process for transcription. In Wireshark, this PDU appears as an outgoing HTTP POST packet toward the Whisper endpoint, representing the start of a speech-to-text operation.
What is a Whisper HTTP Response PDU
A Whisper HTTP Response PDU is the HTTP message that the Whisper server sends back to the softphone after processing an uploaded audio file. It contains the status line, response headers, and a JSON body that includes the recognized transcription text and possibly additional metadata. In Wireshark, this PDU appears as an incoming HTTP response packet from the Whisper endpoint, confirming that the speech-to-text operation completed and returning the result to the application.
What objects does the softphone use?
| Object | Purpose |
|---|---|
ISoftPhone |
Creates and manages the software phone. |
IPhoneLine |
Represents the SIP phone line used for PBX registration. |
IPhoneCall |
Represents the current active call. |
PhoneCallAudioSender |
Sends audio into the call. |
PhoneCallAudioReceiver |
Receives remote audio from the call. |
MediaConnector |
Connects media components together. |
VADFilter |
Detects when the remote caller is speaking. |
WaveStreamRecorder |
Records the current utterance to a WAV file. |
TextToSpeech |
Generates spoken AI responses. |
MSSpeechPlatformTTS |
Provides the Microsoft Speech Platform TTS engine. |
HttpClient |
Handles HTTP requests to Whisper and the AI endpoint. |
Timer |
Detects the end of each utterance based on silence. |
AI call flow
- Create the softphone object with a valid RTP port range.
- Create the SIP account and register it to the PBX.
- Initialize media sender, media receiver, and media connector.
- Initialize the Microsoft Speech Platform text-to-speech engine.
- Wait for an incoming call.
- Answer the call automatically.
- Attach TTS output to the media sender.
- Listen to remote audio through the media receiver.
- Detect voice activity with the VAD filter.
- Record one utterance into a temporary WAV file.
- Stop recording when silence lasts longer than the configured timeout.
- Send the audio to Whisper for transcription.
- Send the transcribed text to the AI model.
- Convert the AI reply to speech with TTS.
- Play the synthesized response back into the call.
- Clean up temporary recordings and media resources at the end.
How the response pipeline works
| Step | Input | Output |
|---|---|---|
| Voice detection | Incoming call audio | Speech segment boundary |
| Recording | Speech segment | Temporary WAV file |
| Speech-to-text | WAV file | Recognized caller text |
| AI processing | Recognized text | Generated answer text |
| Text-to-speech | Generated answer text | Synthesized voice output |
| Call playback | Synthesized voice output | AI reply heard by caller |
Source code analysis
Main()
The Main() method creates the softphone, prepares the SIP account,
starts registration, initializes audio sender and receiver objects, sets up the
text-to-speech engine, and keeps the application alive with
Console.ReadLine().
This method creates the TextToSpeech object, adds the Microsoft
Speech Platform engine, and selects an English voice if one is available. Its
purpose is to prepare spoken AI responses before any call is handled.
This method creates the phone line from the SIP account, subscribes to the phone line registration state event, subscribes to incoming call notifications, and finally sends the SIP registration request. This mirrors the registration sequence described in the original PBX registration tutorial.
line_RegStateChanged()This event handler checks whether registration has succeeded or failed. It prints a status message when the line becomes online or when the PBX rejects the registration attempt.
softphone_IncomingCall()When a call arrives, this method stores the incoming call object, saves the caller ID, subscribes to call state changes, and answers the call immediately.
call_CallStateChanged()
This event handler follows the lifecycle of the call. When the state becomes
Answered, media processing is initialized, and when the call ends,
the program cleans up resources and removes the event handler.
This method connects the text-to-speech engine to the call audio sender, creates and configures the VAD filter, connects incoming audio to the filter, creates the silence timer, and attaches both media sender and receiver objects to the active call.
vadFilter_VoiceDetected()This method is called whenever the VAD filter detects incoming voice activity. It updates the last detected speech time, starts a new recording if needed, and resets the silence timer while the remote speaker is still talking.
StartRecording()
A unique WAV filename is created for each utterance, then a
WaveStreamRecorder is initialized and connected to the remote audio
receiver. Recording starts immediately after the media path is connected.
When no voice is detected for the configured timeout period, this method closes the current recording safely and starts asynchronous processing of the recorded utterance.
ProcessUtteranceAsync()This is the main AI pipeline method. It first sends the WAV recording to Whisper, then sends the transcribed text to the AI model, and finally pushes the generated response text into the text-to-speech engine so the answer can be spoken back to the caller.
SendToWhisperAsync()This method uploads the recorded WAV file to the Whisper transcription endpoint using multipart form data. It then parses the JSON response and returns the recognized text.
SendToAiAsync()This method creates an OpenAI-compatible JSON request body containing the system prompt and the recognized caller text. It posts that request to the configured AI endpoint, reads the response JSON, and extracts the returned assistant message.
CloseDevices()This method stops the silence timer, finalizes any active recording, triggers final utterance processing if needed, disconnects and disposes the VAD filter, disconnects the TTS engine from the sender, detaches media objects from the call, and disposes all remaining resources.
Notes
- Use valid SIP credentials and a reachable PBX server.
- Make sure both the Whisper endpoint and the AI endpoint are accessible from the host.
- Install a compatible Microsoft Speech Platform voice if you want spoken responses.
- Adjust the VAD level and silence timeout to fit your audio environment.
- Consider adding queueing, rate limiting, or cancellation logic for production use.
Next step possibilities
This example can be extended with conversation history, caller authentication, transcript logging, database storage, prompt customization, multilingual speech handling, or outbound AI-assisted call scenarios.