
How to make and accept calls using SIP/VoIP
 |
Download: | call-make-accept.zip |
This tutorial demonstrates how to develop a softphone in C# using the VoIP-SIP-SDK to make and accept SIP/VoIP calls. It covers the complete SIP call flow including Invite, Trying, Ringing, OK, Ack, and Bye PDUs, along with detailed source code analysis for call management, device handling, and media connections. The guide also includes Wireshark capture examples to visualize SIP traffic and provides practical solutions for thread blocking issues in softphone applications.
Why do we need to make and accept calls in a VoIP Softphone?
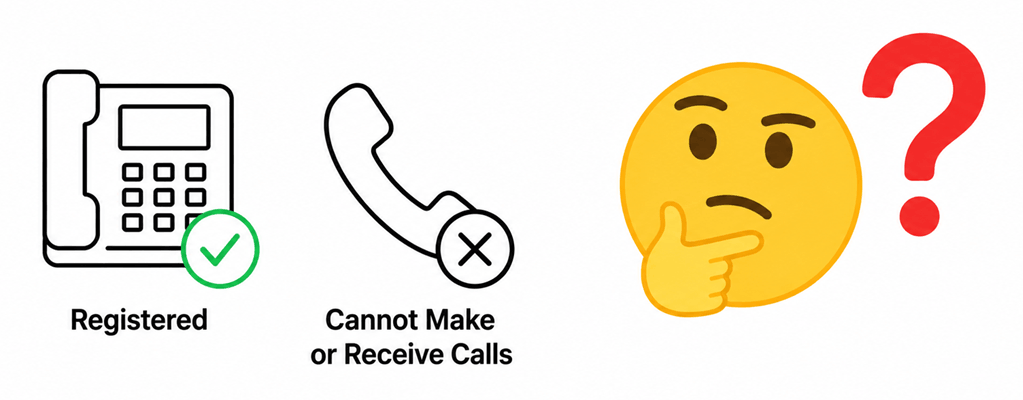
Registering a softphone to a PBX only makes it reachable on the network — it doesn't yet let the softphone actually talk to anyone. Without dedicated logic for making and accepting calls, a registered phone would simply sit idle, unable to originate a call to another extension or respond when someone dials in. Handling calls means reacting to a sequence of states, an incoming call arriving, the call being answered, audio actively flowing, and eventually the call ending, and wiring the right MediaHandlers to the call object at each stage.
What is a SIP call?
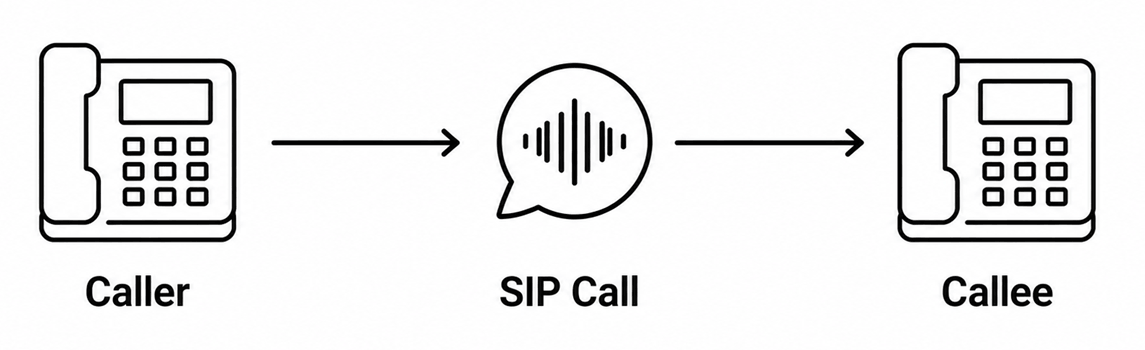
A SIP call is a voice or video session established between two SIP endpoints through a series of signaling messages, INVITE, provisional responses like TRYING and RINGING, a final 200 OK, and an ACK, that negotiate who is calling whom and which audio codec and network port to use. Once this signaling exchange completes, the two endpoints exchange RTP media packets directly, carrying the actual voice data for the conversation. The call ends when either side sends a BYE, which the other side acknowledges with a 200 OK, tearing down the session and releasing the resources tied to it.
How does it work?
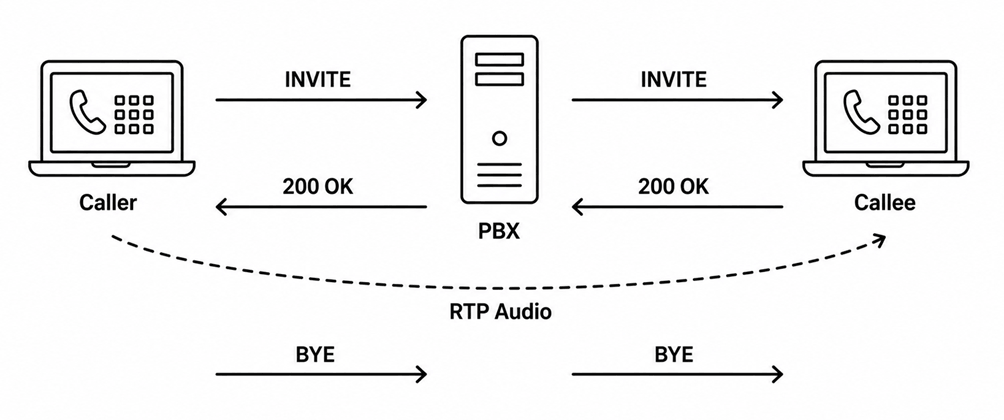
The diagram below illustrates a complete SIP call from start to finish between a caller softphone, a PBX acting as the SIP server, and a callee softphone. The caller sends an INVITE, which the PBX forwards to the callee while replying with a provisional 100 Trying; once the callee's phone starts ringing, a 180 Ringing response travels back to the caller so it can play a ringback tone. When the callee answers, a 200 OK carrying the agreed codec and RTP port travels back through the PBX, the caller confirms with an ACK, and audio then flows directly between the two softphones over RTP. Either side can end the call with a BYE, which the other side acknowledges with a final 200 OK, tearing the dialog down and releasing the call's resources.
How to build and run your solution
Download the project and extract it to a folder of your choice, then open the solution file in Visual Studio. Review the project structure briefly so you know where the Softphone and Program classes can be found. Once you're ready, build the solution and run the console application; on startup, the softphone prompts for your SIP account details before attempting registration.
How to test the solution
Enter your SIP account details and wait for registration to succeed, then type a number and press Enter to place a call. From a second registered softphone, confirm the incoming call is answered automatically, and that audio flows in both directions once the call is InCall. End the call from either side and confirm the console prompts for a new number to dial right away.
Key source code
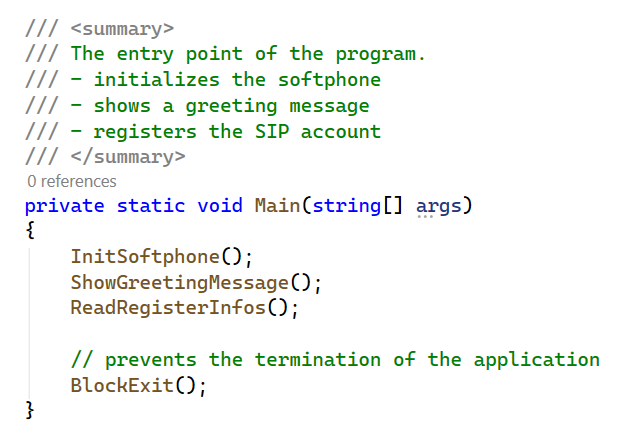
This snippet shows the Main() method in Program.cs, which is the entry point of the application. It initializes the softphone, subscribes to the registration state, call state, and incoming call events, then calls the registration method to connect to the PBX. Once registered, the program enters a loop asking the user to dial a number or accept an incoming call, keeping the console open until the user chooses to exit.
What knowledge would you need?
This example assumes you're already familiar with SIP registration and media handlers, covered in the earlier tutorials linked below. Only the new elements introduced in this example are covered on this page.
Please note that, only the softphone's new elements will be introduced here. You can find the registration's process and the needed elements for that in the first example, called "SIP Registration".
What's new compared to SIP Registration?
This example adds the objects, methods, and namespaces needed to actually place and answer calls on top of the registration logic from the previous tutorial. Add these three lines to the "using" section so the SDK's tools don't need to be fully namespace-qualified everywhere they're used:
using Ozeki.Media.MediaHandlers;
using Ozeki.VoIP;
using Ozeki.VoIP.SDK;
Beyond the softphone and phone line objects from the registration example, the Softphone class now needs a call object, audio devices, and a way to connect them:
IPhoneCall call;
Microphone microphone;
Speaker speaker;
MediaConnector connector;
PhoneCallAudioSender mediaSender;
PhoneCallAudioReceiver mediaReceiver;
The microphone connects to mediaSender, and the speaker connects to mediaReceiver, both through the connector object. mediaSender and mediaReceiver then attach to the call object itself, which is what actually lets voice flow during the call. The sender and receiver can just as easily be connected to other media handlers instead of physical devices, covered further in the media handlers guide. A boolean tracks whether a call is currently incoming, initialized to false since the softphone starts with no active call:
bool incomingCall;
All of these are set up together in the constructor:
microphone = Microphone.GetDefaultDevice();
speaker = Speaker.GetDefaultDevice();
connector = new MediaConnector();
mediaSender = new PhoneCallAudioSender();
mediaReceiver = new PhoneCallAudioReceiver();

incomingCall = false;
Starting, stopping, and connecting devices
Two small helper patterns are used throughout: starting/stopping a device only if it
exists, and connecting two media handlers together through the connector. Starting
the microphone looks like this, and stopping it works the same way with
Stop() instead:
if (microphone != null)
{
	microphone.Start();
}
Connecting works the same way: the connector's first argument is the source of the audio, the second is the destination. The microphone feeds into mediaSender, and mediaReceiver feeds into the speaker:
if (microphone != null)
{
	connector.Connect(microphone, mediaSender);
}

if (speaker != null)
{
	connector.Connect(mediaReceiver, speaker);
}
This example connects the devices only once, at softphone initialization, since
there's no need to disconnect them later. A single Disconnect() call
exists for breaking one connection, and connector.Dispose() closes
every connection at once if that's ever needed:
connector.Dispose();
Subscribing to call events and listening for incoming calls
A call object's CallStateChanged event needs to be subscribed to
before its state changes are visible to the rest of the application, and
unsubscribed from the same way using -= once the call ends:
call.CallStateChanged += (call_CallStateChanged);
Separately, the softphone itself needs to know when a call is arriving in the first place, which is set up once at initialization:
softphone.IncomingCall += softphone_IncomingCall;
When that event fires, the call object is stored, its own state-changed event is
subscribed to using the method above, and incomingCall is set to
true to mark that there's a call waiting to be accepted. This example
doesn't do anything special if an error occurs during a call beyond notifying the
user. That's left as a starting point for further development.
Handling the call's states
Reacting correctly to call state changes is the core of the Softphone class. This
example only needs three named states: CallState.Answered,
CallState.InCall, and CallState.Error. Answered fires only
once per call, the moment it's picked up; InCall can fire many times over a call's
lifetime, for example whenever a held call resumes (covered in the next tutorial,
"Controlling the call").
CallState.Answered
CallState.InCall
CallState.Error
When a call is Answered, the devices are started and the media handlers are attached to the call. The devices themselves were already connected to mediaSender/mediaReceiver back at initialization, so only the call attachment is new here:
mediaReceiver.AttachToCall(call);
mediaSender.AttachToCall(call);
When a call is InCall, only the devices need to be started again, since the media handlers are already attached. Both states assume the call's events were already subscribed to, either when the call was placed or when it was accepted as incoming.
Once a call ends, checked via IsCallEnded(), which covers several end
states including errors, the devices are stopped, the media handlers are detached,
the call's events are unsubscribed, and the call object itself is set to null.
Program.cs decides what actually happens next when the call's state changes.
Making and accepting calls
Making a call means creating a call object (if one isn't already active), wiring up
its events, and calling Start():
if (call == null)
{
call = softphone.CreateCallObject(phoneLine, numberToDial);
WireUpCallEvents();
call.Start();
}
Accepting a call only makes sense once incomingCall is true. In this
example that state is only ever communicated as a text prompt, though there are
plenty of SDK and language options for playing an actual ringtone instead. Accepting
clears the flag first, then calls Answer():
if (incomingCall == true)
{
	incomingCall = false;
	call.Answer();
}
Either a made or accepted call is ended the same way, with the call object's
HangUp() method.
Solving thread blocking
The source file includes a DispatchAsync(Action action) method,
used to work around the fact that Console.ReadLine() would otherwise
block the thread handling SDK events.
Program.cs: tying it together
Program.cs drives the console UI on top of the Softphone class, automatically accepting incoming calls and placing outgoing calls to whatever number the user types. Everything is split into small methods that call each other, keeping the flow readable. Initialization subscribes to every event the softphone exposes:
mySoftphone = new Softphone();
mySoftphone.RegistrationStateChanged += mySoftphone_PhoneLineStateChanged;
mySoftphone.CallStateChanged += mySoftphone_CallStateChanged;
mySoftphone.IncomingCall += mySoftphone_IncomingCall;
From there, Program.cs reacts to what the Softphone class reports: it prints a message when a call error occurs, automatically accepts any incoming call by calling the softphone's accept method, and once a call ends, asks the user for the next number to dial. Registration success is handled the same way it was in the SIP Registration example, just followed here by prompting for a number instead of stopping there.
Capture SIP call make and accept traffic with Wireshark
The following video shows how to use Wireshark to capture and inspect SIP call make and accept traffic.
SIP Invite PDU
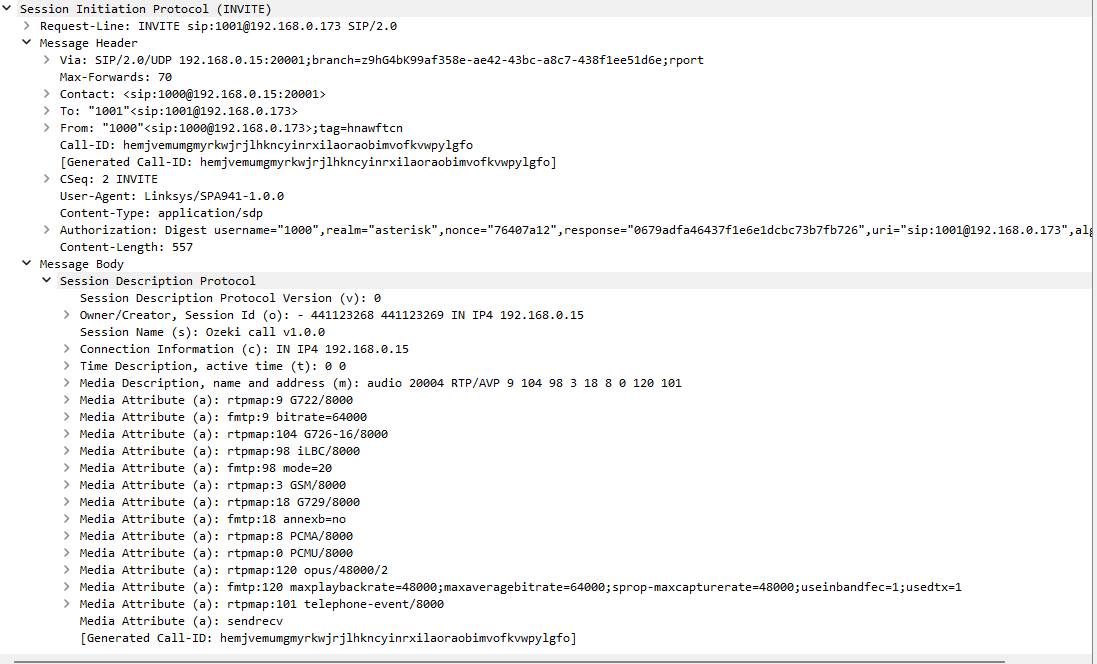
A SIP INVITE PDU is the message a SIP user agent sends to initiate a VoIP call, specifying the caller, callee and the proposed media session in its headers and SDP body. Key headers include From and To, which identify the endpoints, Call-ID and CSeq for correlating this INVITE with its provisional and final responses, and Via to describe the transport path through the SIP network. The INVITE also typically carries a Contact header and codec/port information in SDP so the remote side can establish media streams once the call is answered and moves into the InCall state.
SIP Trying PDU
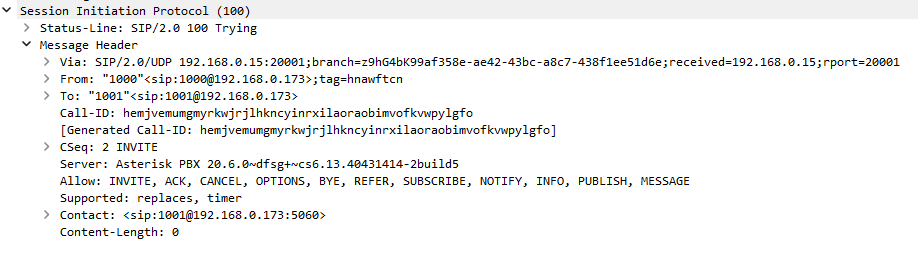
A SIP TRYING PDU is a provisional response the PBX or SIP server sends to indicate that it has received the INVITE and is currently attempting to locate and alert the called party. It uses the same Call-ID, CSeq and Via header values as the original INVITE so the caller can match this TRYING to the correct transaction. This response does not carry media information and serves purely as a signaling acknowledgment that call setup is in progress before any ringing or answer occurs.
SIP Ringing PDU
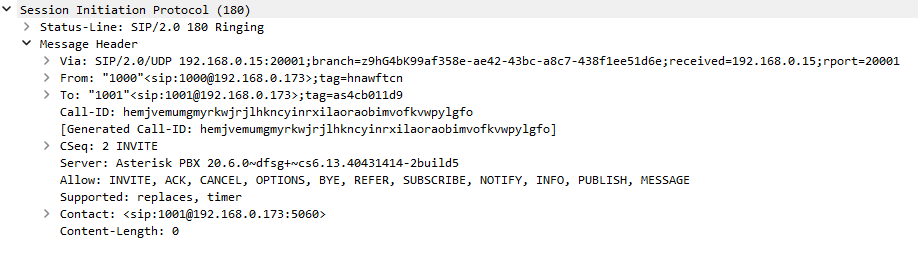
A SIP RINGING PDU is a provisional response sent when the destination user agent is being alerted, informing the caller that the remote phone is currently ringing. It maintains the dialog context using the same Call-ID and incremented CSeq, and includes To and From headers that identify the established call leg. Like TRYING, RINGING contains no SDP body by default, but it provides user feedback and can be used by the softphone to update its UI to a Ringing state.
SIP OK(Invite) PDU
A SIP OK (INVITE) PDU is the final 200-class response indicating that the called party has accepted the call, completing the INVITE transaction and establishing the SIP dialog. In addition to mirrored Call-ID, To, From, CSeq and Via headers, it typically includes a Contact header and an SDP body that confirms the negotiated codecs and media endpoints. Once this OK is received, the caller sends an ACK and both sides start media transmission, transitioning the softphone into the InCall state with active audio handlers attached to the call object.
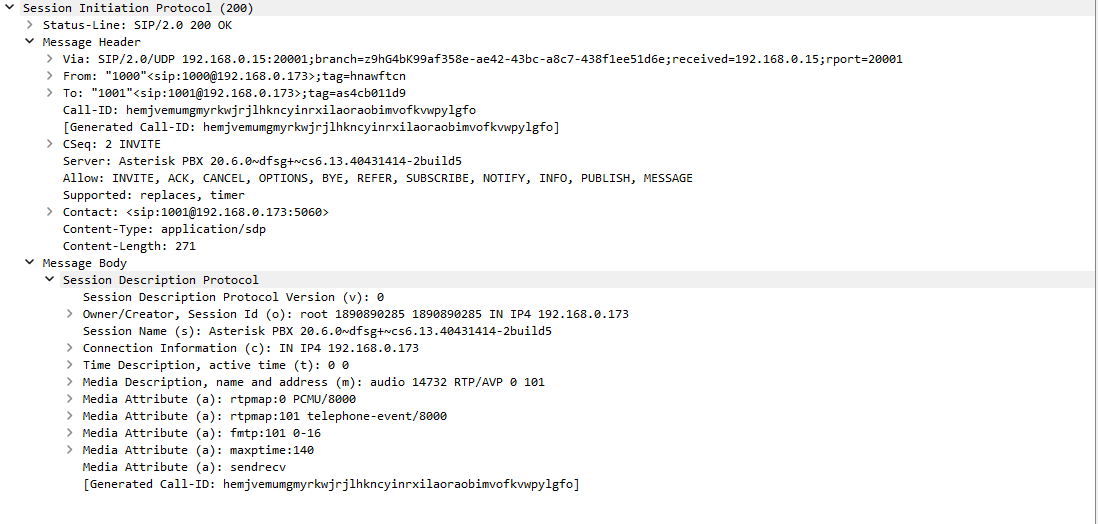
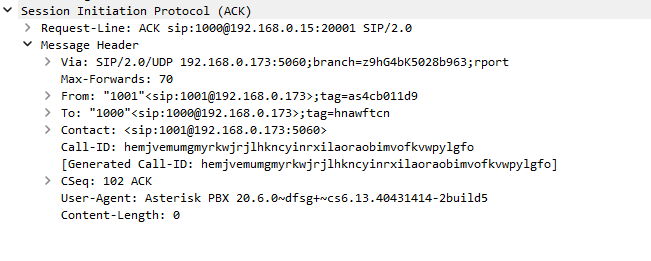
SIP Ack PDU
A SIP ACK PDU is the confirmation message a SIP user agent sends after receiving a final 200 OK to an INVITE, signaling that the call setup has completed successfully. Key fields include the Call-ID and matching CSeq, which bind the ACK to the original INVITE transaction, along with the From and To headers that identify the established dialog endpoints. Although the ACK itself usually carries no SDP body, its successful delivery allows both sides to rely on the previously negotiated media parameters and transition fully into the InCall state with active audio handlers.
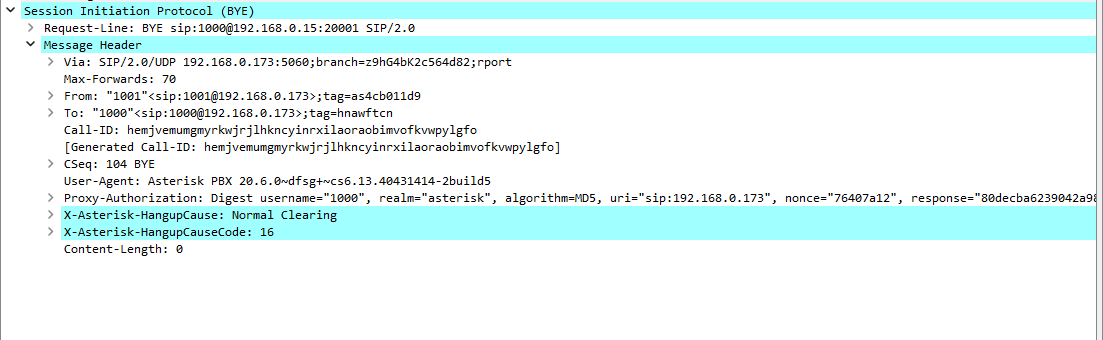
SIP Bye PDU
A SIP BYE PDU is the termination request sent by either party to end an established SIP call, signaling that the current dialog should be torn down. It reuses the existing Call-ID, To and From headers of the dialog and carries an appropriate CSeq value to ensure the BYE is processed in order within that session. When a BYE is sent or received, the softphone stops devices, detaches media handlers, unsubscribes from call events, and releases the call object to return to an idle state.
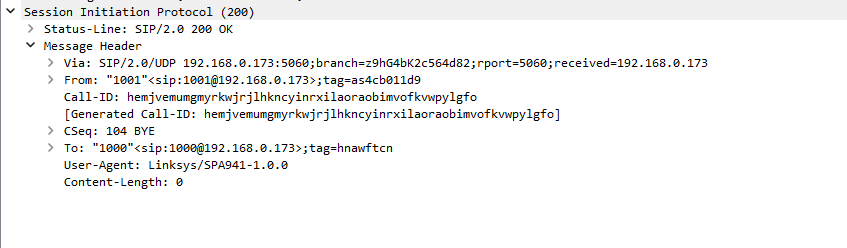
SIP OK(Bye) PDU
A SIP OK (BYE) PDU is the 200-class response confirming that the BYE request was successfully processed and that the call has now ended. It matches the BYE using the same Call-ID and CSeq, and includes standard To, From and Via headers to complete the transaction cleanly. After receiving this OK, both sides can safely release resources associated with the dialog, ensuring that media streams are stopped and no further signaling occurs for that call.
Debug SIP call events in Asterisk
The following video shows how to enable SIP debugging in the Asterisk console and observe the SIP messages exchanged during a call in real time. It covers connecting to the Asterisk CLI, turning on SIP debug output, reading the INVITE and provisional responses as they appear after a call is made from the softphone.
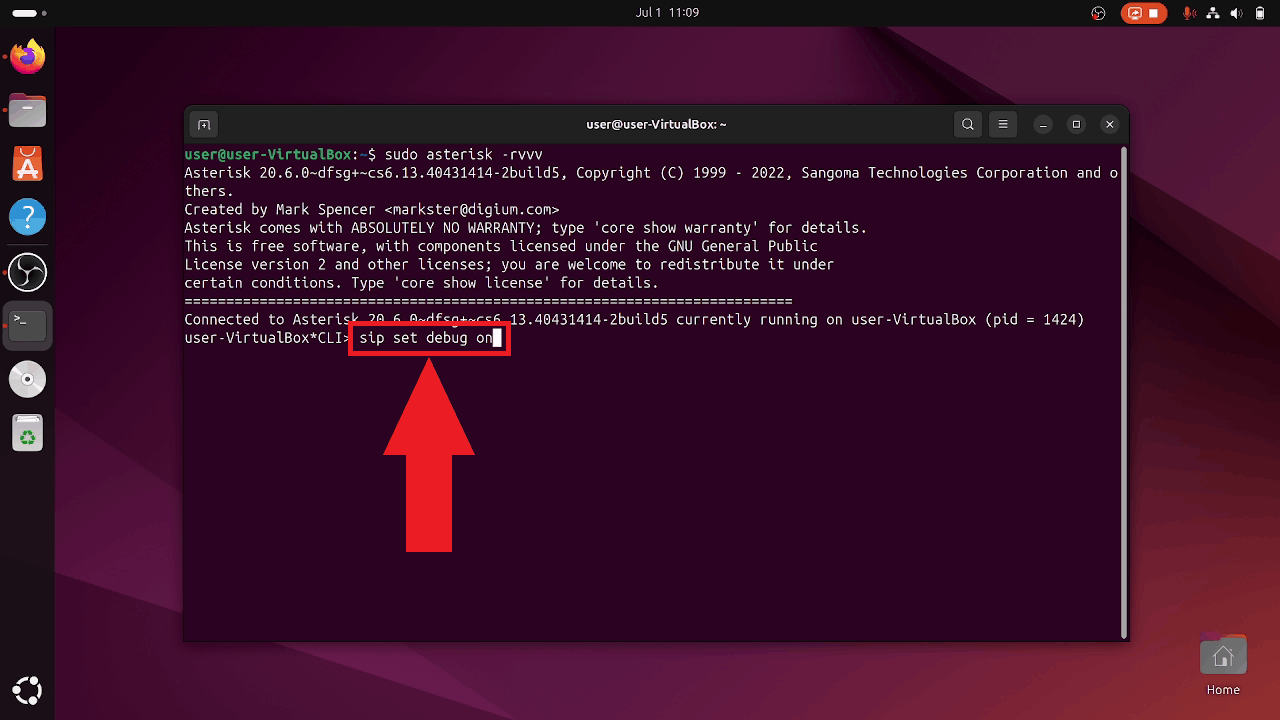
Connect to the Asterisk console with verbose logging enabled, then run the following command to enable SIP debugging. Once enabled, Asterisk will print the full contents of every SIP message it sends or receives directly to the console, including the INVITE, 100 Trying, 180 Ringing, 200 OK, ACK, and BYE messages that make up a complete call.
sip set debug on
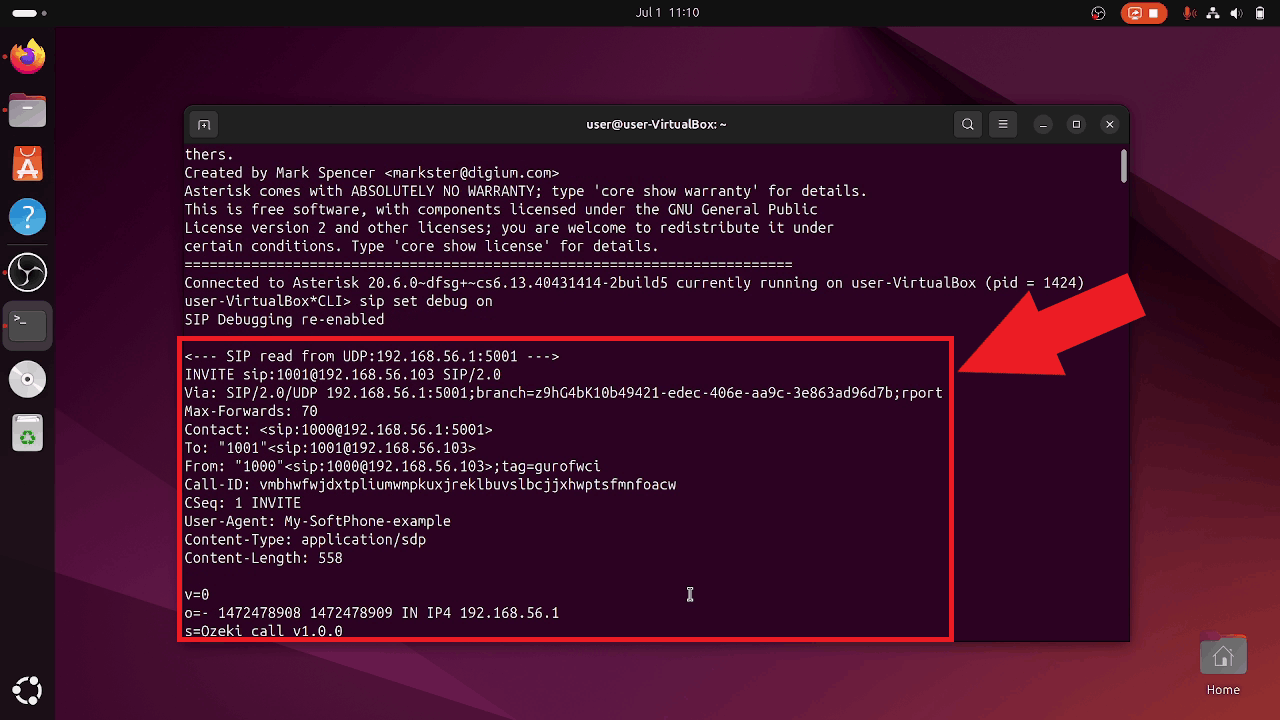
With SIP debugging enabled, place a call from the softphone and watch the Asterisk console output. The highlighted block shows an incoming INVITE event, including the From and To SIP URIs identifying the caller and callee, the Call-ID uniquely labeling the dialog, the CSeq sequencing the transaction, and the SDP body beginning below the headers, which carries the media parameters for the call.
Conclusion
This tutorial covered making and accepting calls with Ozeki VoIP SIP SDK: creating a call object, wiring the microphone and speaker to it through media handlers, and reacting to the Answered, InCall, and call-ended states to start and stop devices at the right moments. It also traced the underlying SIP call flow and verified it by inspecting live traffic in both Wireshark and Asterisk's SIP debug output.
If you have any questions or need assistance, please contact us at info@voip-sip-sdk.com