
VoIP softphone: SIP Register
 |
Download: | basic-sip-registration.zip |
This tutorial shows you how to build a simple VoIP Softphone console application softphone in C# using the Ozeki VoIP SIP SDK, capable of registering itself to a PBX with a SIP account supplied by the user. You will learn how to reference the SDK in Visual Studio, structure the example into a Softphone and a Program class, and configure a SIP account to register a phone line. Beyond the code itself, this guide also shows you how to verify that registration is actually working, by watching the SIP REGISTER exchange directly in the Asterisk console and capturing the same traffic with Wireshark.
Why do we need SIP Registration in a VoIP Softphone?
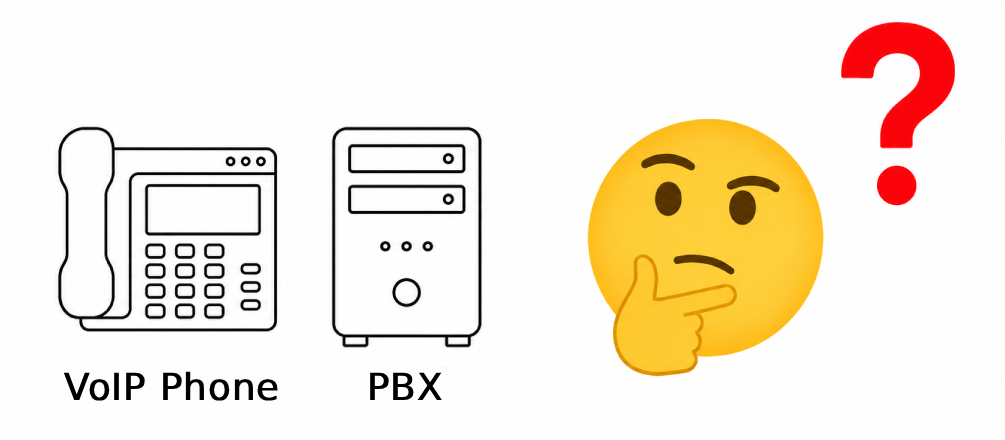
A PBX needs to know exactly where to send a call before it can deliver one. Phones don't have a fixed, permanent location on the network: they can be assigned a different IP address each time they connect, move between networks, or simply be switched off. SIP registration solves this by having each phone periodically tell the PBX "this is who I am, and this is where you can currently reach me." Without this step, the PBX would have no reliable way of finding a phone, and incoming calls to that extension would have nowhere to go.
How does it work?
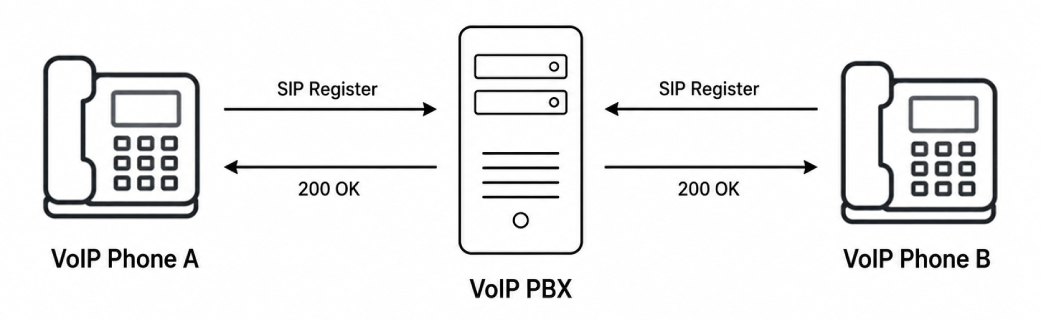
Before diving into the code, it helps to see the bigger picture of what SIP registration actually involves. In this example, a VoIP Phone A and a VoIP Phone B both register themselves with a PBX by sending a SIP REGISTER request. The PBX checks the credentials provided in the request and, if they are valid, responds with a 200 OK message, confirming that the phone is now registered and reachable for incoming calls. Both phones perform this exchange independently and symmetrically; registering one phone does not depend on the other, but once both are registered, the PBX can route calls between them.
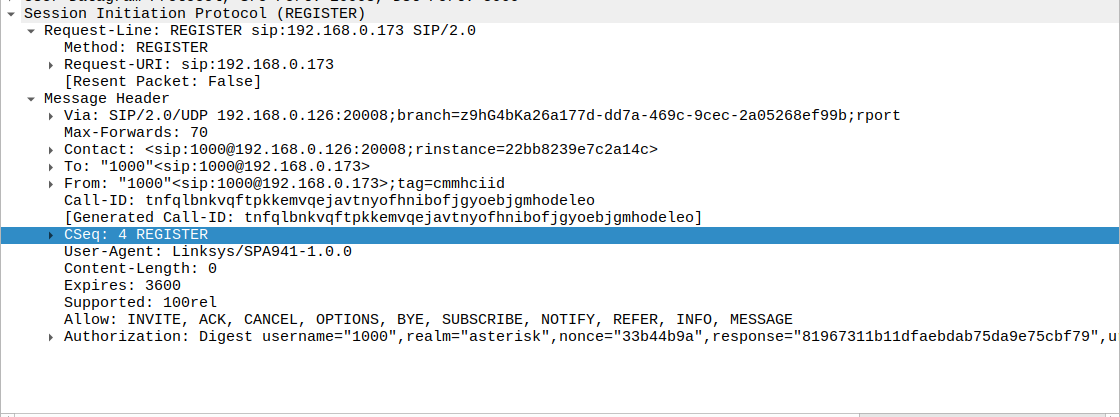
What is a SIP Register PDU
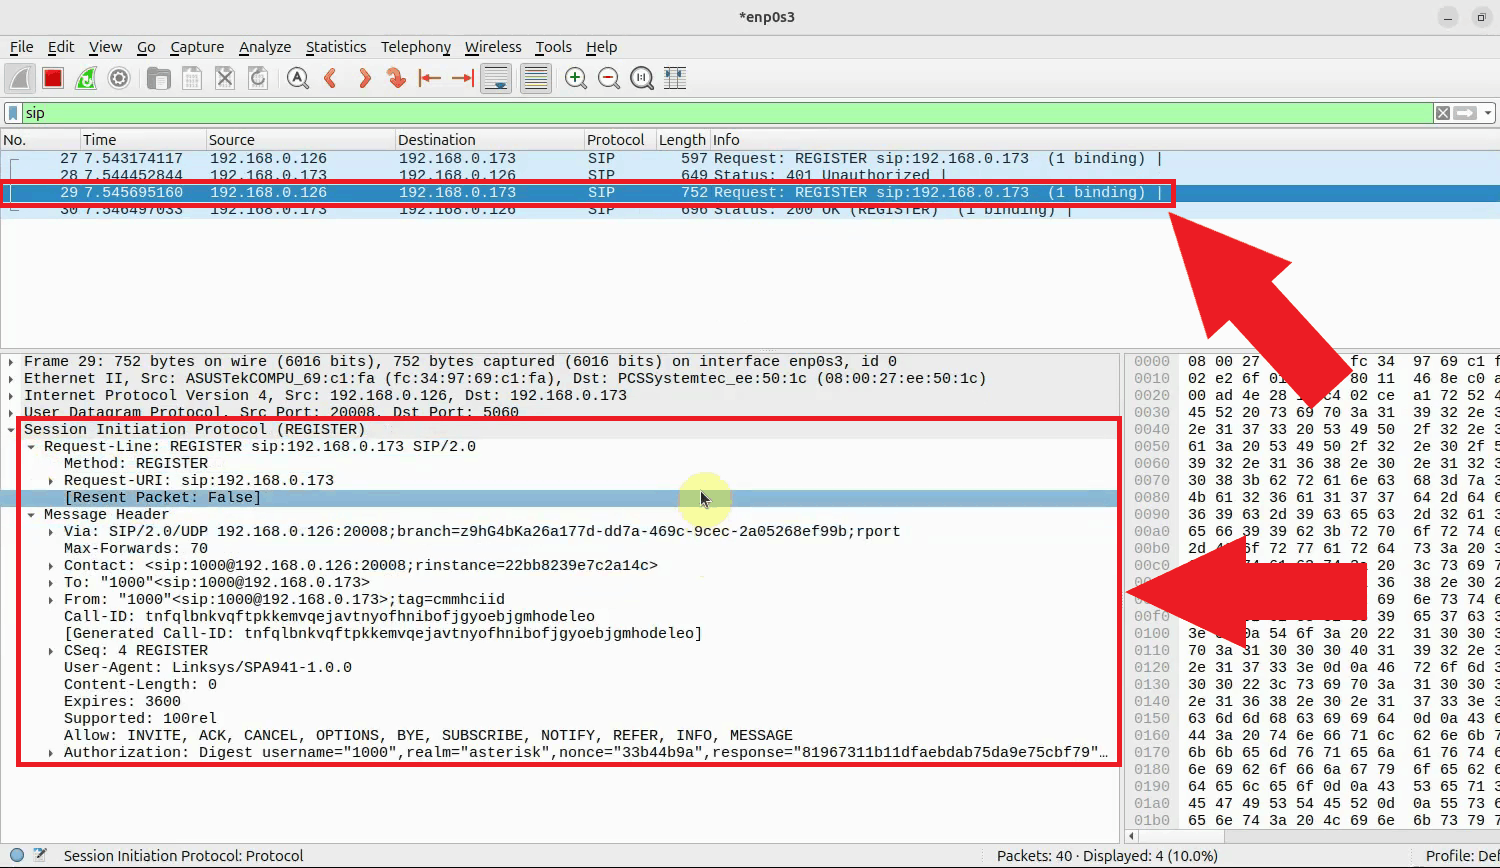
A SIP REGISTER PDU is the actual message a SIP client sends to register itself with a PBX, carrying its identity and authentication details in a set of header fields. Key fields include the Contact header, which tells the PBX where to reach the client, the CSeq number used to match requests with their responses, and the Authorization header, which contains the digest credentials proving the client's identity.
What is a SIP Registration Response PDU
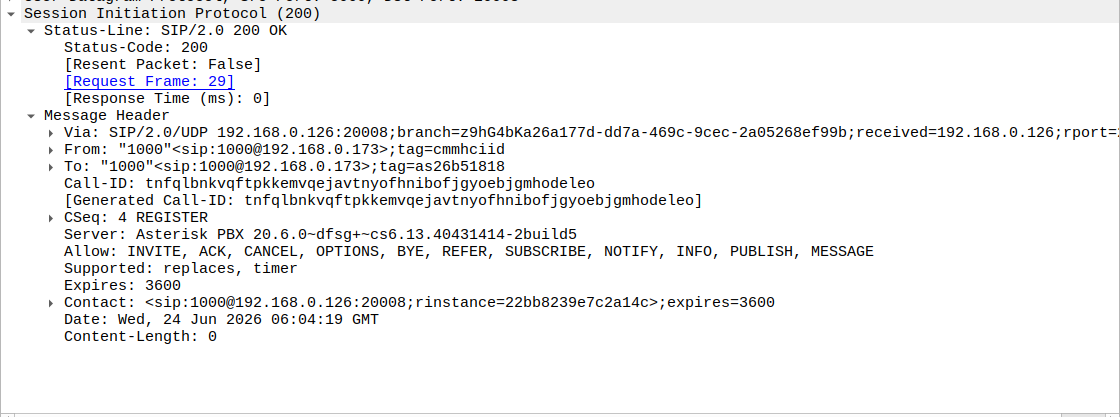
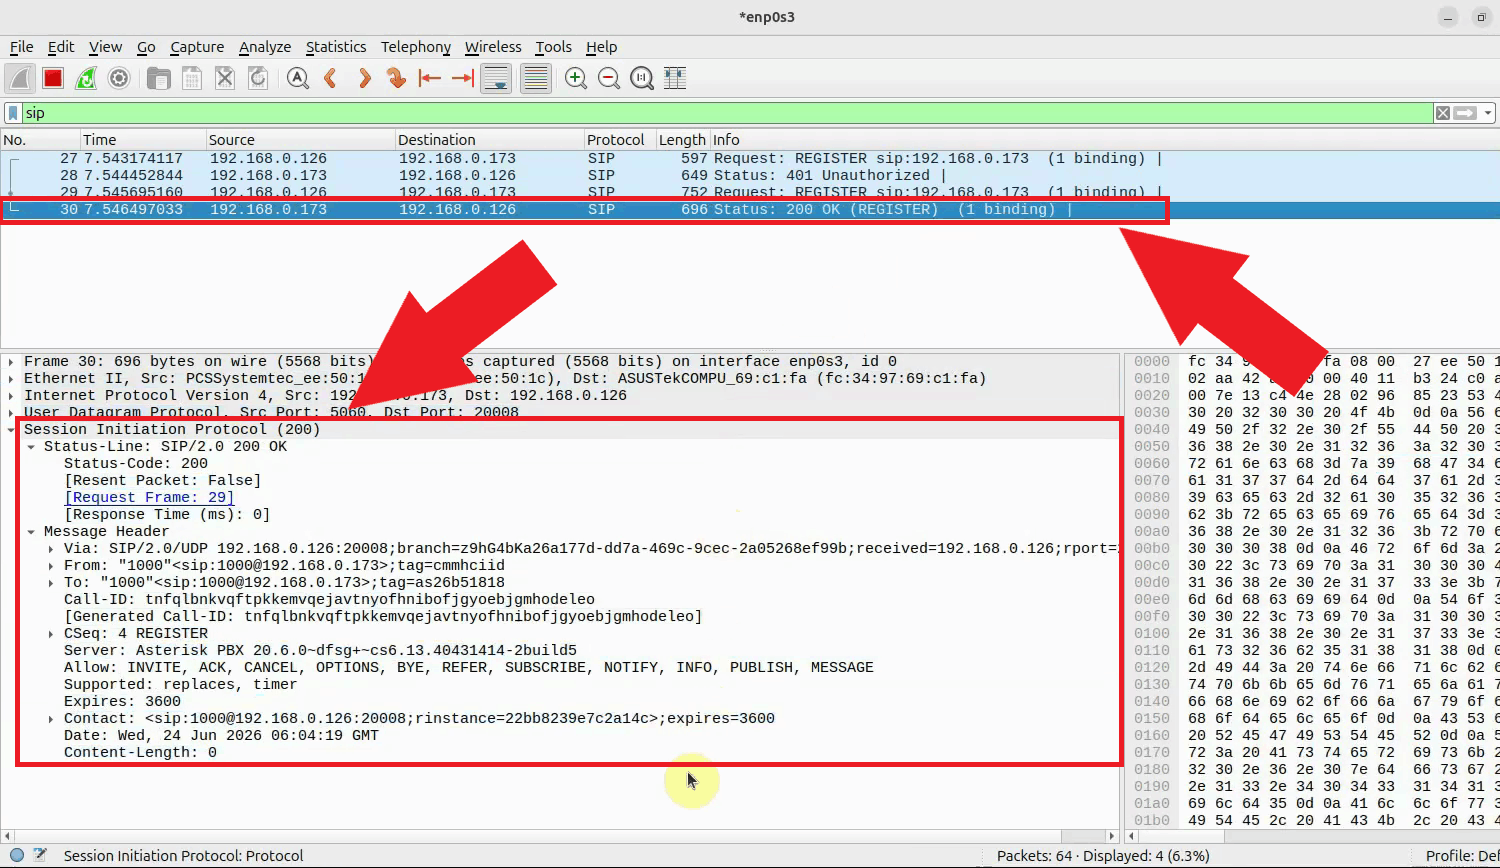
The PBX replies to a successful registration with a 200 OK response PDU, confirming that the client's credentials were accepted and the registration is now active. Fields such as Expires indicate how long the registration is valid for before it needs to be renewed, while the Contact header echoes back the address the PBX will use to reach the client for incoming calls.
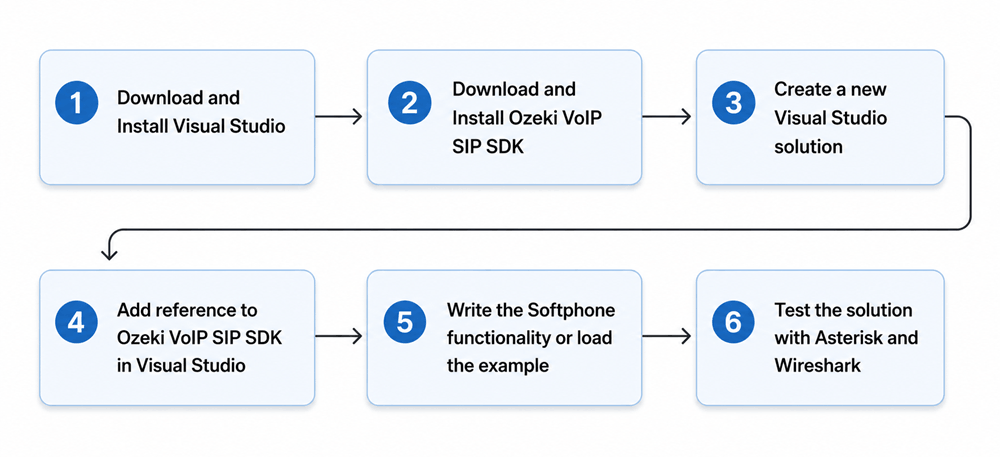
What are the steps to build a VoIP Softphone that performs SIP registration
You are going to write the code in C#.Net, You will need Visual Studio and Ozeki VoIP SIP SDK. Please follow the following steps to create this solution:
Related: VoIP SIP Registration. If you also wish to build a VoIP softphone on Android, you might also be interested in a similar document, the SIP account registration in Ozeki VoIP SDK for Android
How to build the solution
The following video shows how to build and run the basic SIP registration example from start to finish.
If you want to create your own application to reproduce this solution, you have to create a new console application in Visual Studio.
Key source code
This source code configures the SIP account parameters and creates a softphone instance that can register to the PBX at 192.168.115.60:5060 using extension 111 and its credentials. It also subscribes to the phone line state change event so the application can react when registration succeeds or fails. Finally, it calls the Register method on the Softphone object, which initiates the SIP REGISTER process towards the PBX using the provided settings.
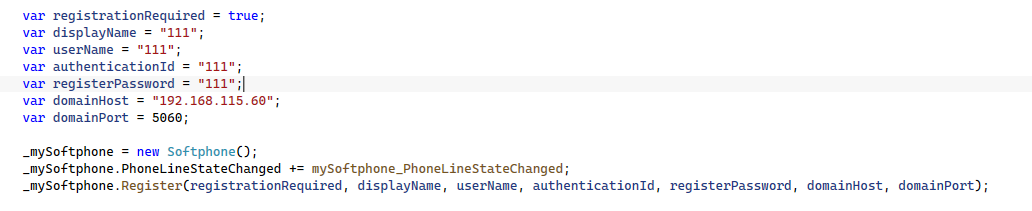
var registrationRequired = true;
var displayName = "111";
var userName = "111";
var authenticationId = "111";
var registerPassword = "111";
var domainHost = "192.168.115.60";
var domainPort = 5060;

_mySoftphone = new Softphone();
_mySoftphone.PhoneLineStateChanged += mySoftphone_PhoneLineStateChanged;
_mySoftphone.Register(registrationRequired, displayName, userName, authenticationId, registerPassword, domainHost, domainPort);
How to add reference to Ozeki VoIP SIP SDK
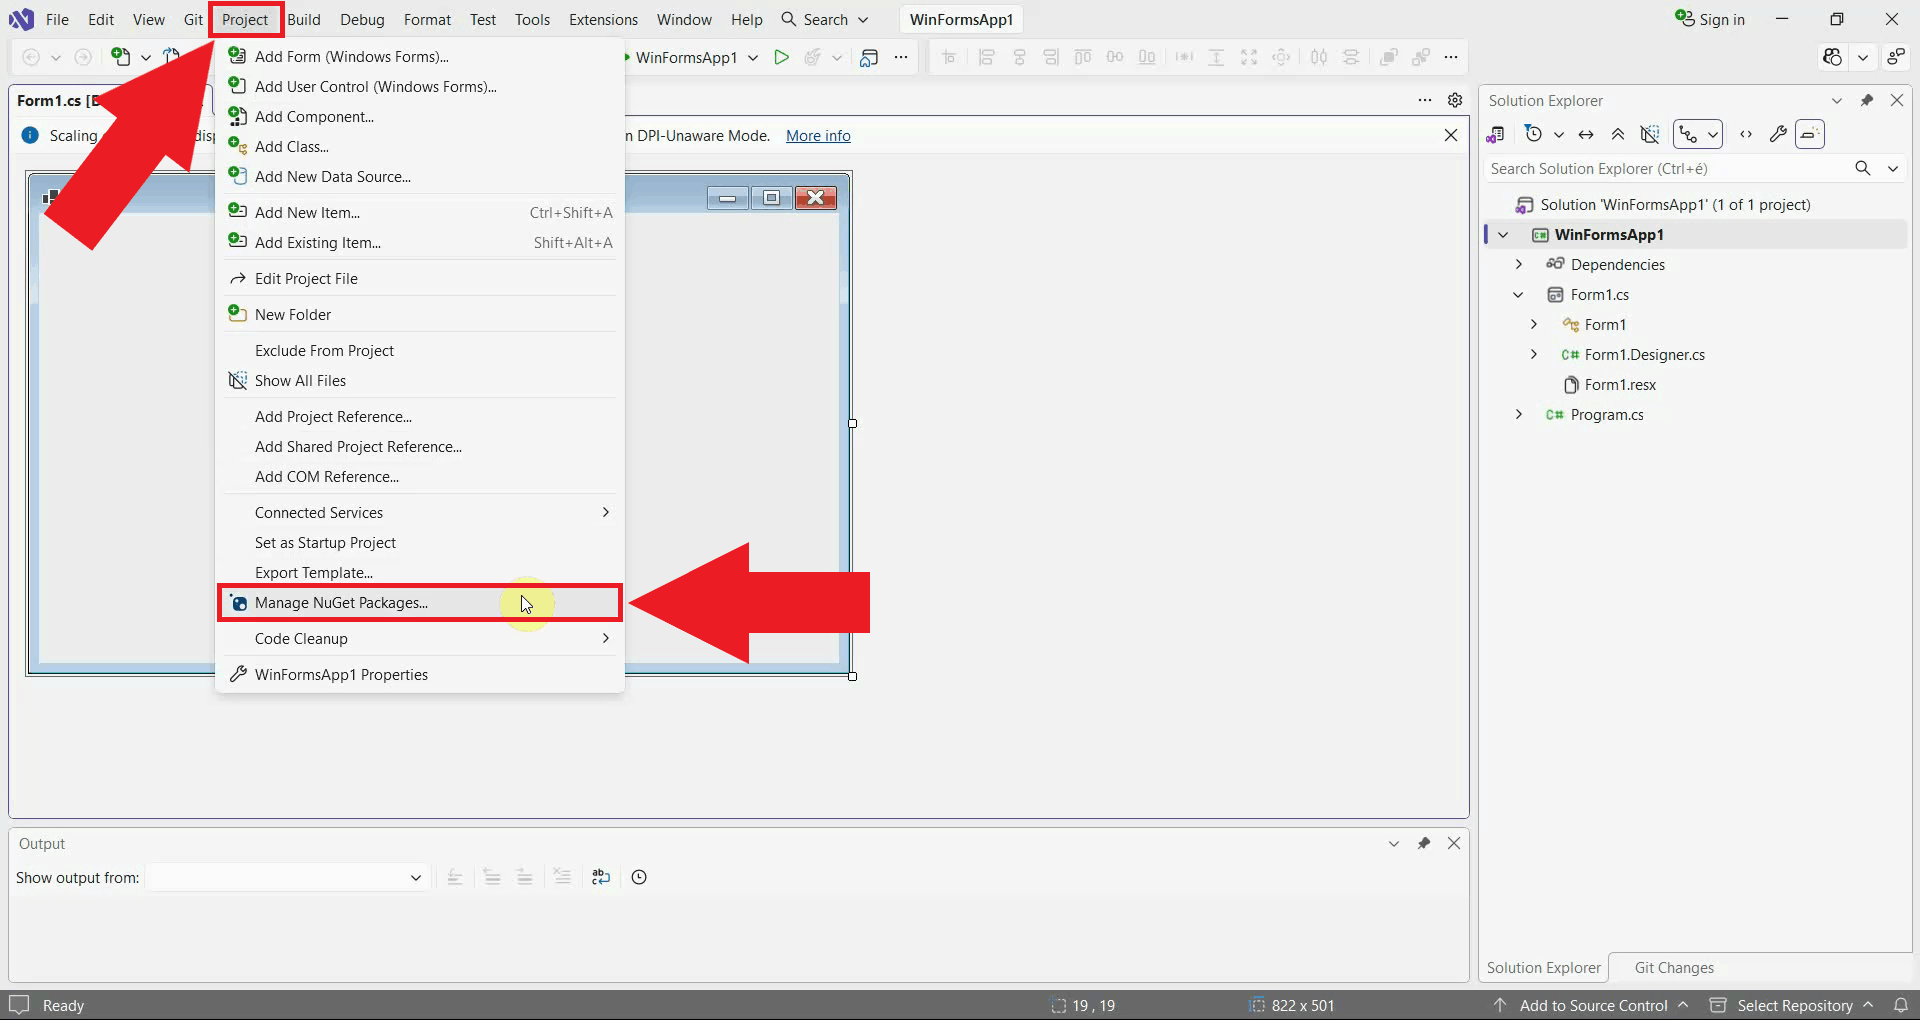
To use the tools provided by the Ozeki VoIP SIP SDK, you have to add a reference to it in your project. The SDK can be downloaded as a NuGet package through Visual Studio's NuGet Package Manager.
Right click on the project in the Solution Explorer, or use the Project menu, and select Manage NuGet Packages... (Figure 1).
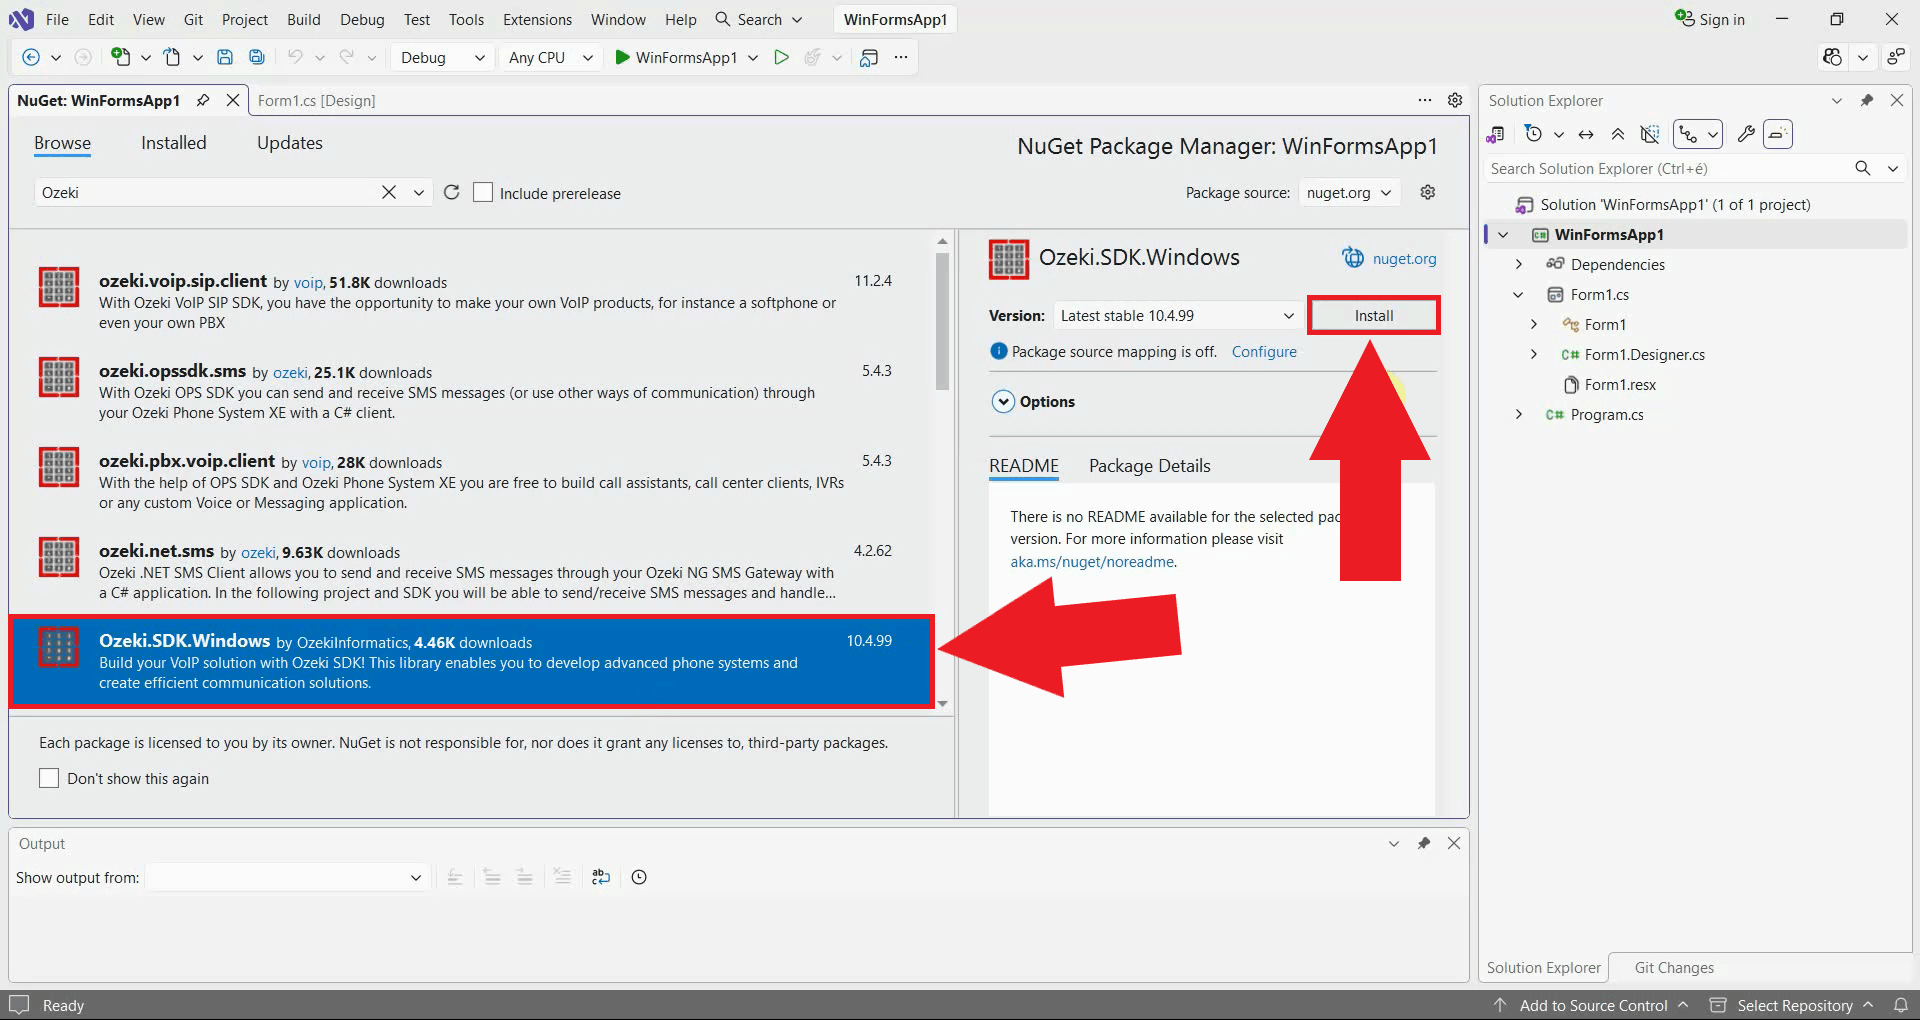
On the Browse tab, search for Ozeki, select Ozeki.SDK.Windows from
the results, choose the latest stable version, and press Install (Figure 2).
Once the installation finishes, the package appears under Dependencies > Packages in
the Solution Explorer, and a PackageReference entry is added to your project file
automatically. This indicates that you can now use the tools provided by the SDK.
Source code of the example, written in C#
To separate the softphone from the user interface - from the console, this time -, the best idea is to use two separate classes in this example:
- Softphone.cs:
- Program.cs:
The softphone's implementation goes here, all of it's events, methods, functions, variables.
Our class with the Main() method, this class controls the console window, interacts with the user, by using a softphone object.
Source code analysis
To understand the source code, the softphone's functions and their usage, we need to discuss the details. In the "using section" we need to add some extra lines, like:
using Ozeki.VoIP;
using Ozeki.VoIP.SDK;
Without these lines we would have to use the namespace information as a label for all tools of the SDK.
What is Softphone.cs used for?
This class is used to introduce how to declare, define and initialize a softphone, how to handle some of the Ozeki VoIP SIP SDK's events and how to use some of that's functions. In other words, we would like to create a "telephone software", which has the same functions (or much more), as an ordinary mobile (or any other) phone. In the Program.cs class we will use this class to create a new softphone, so we can use the functions, we can listen to the events placed here.
What objects does the softphone class use?
We need to create a softphone and a phone line object from the ISoftPhone and the IPhoneLine interfaces:
ISoftPhone softphone;   // softphone object
IPhoneLine phoneLine;   // phoneline object
In a constructor, we also initialize this softphone with default parameters.
softphone = SoftPhoneFactory.CreateSoftPhone(5000, 10000);
We need to set the port range, indicated by the first two parameters as the minimum port's and the maximum port's number, this is the port's interval. If we have any firewall rule which restricts the usable ports, we can set the usable port range here, which will be used during the calls. These are sample ports only in the example, but a softphone with these parameters can be used in the most of the cases. Please note that, if you are handling conference calls, or handling a lot of lines simultaneously, you will need a wide port range.
How to register to a PBX?
To be able to communicate, we need to register our softphone to a PBX. To do this, the example uses the Register method. We need to create a phone line for this registration, which needs a SIP account and a NAT Traversal method.
SIP account:
At the SIP account's creation we can set (usually, we have to set) the following:
- RegistrationRequired: is the registration required or not? This field needs to be set to "true" if we would like to receive incoming calls.
- DisplayName: a name to be displayed at the called client.
- UserName: if another client dials this name (number), we get called.
- AuthenticationId: an identifier to the PBX, like a login name.
- RegisterPassword: the password used to register with the PBX. Works together with the authentication ID.
- DomainHost: a domain name, or an IP address, for example.
- DomainPort: the port number.
The last two values define the PBX to register to.
var account = SIPAccount(registrationRequired, displayName, userName,
authenticationId, registerPassword, domainHost, domainPort);
We will get the values for these parameters from the user in the Program.cs file.
How to set up a PhoneLine object?
To communicate (and to register to the PBX), we need to create a phone line. We've already created the necessary SIP account, so we can use it to create the phone line:
phoneLine = softphone.CreatePhoneLine(account);
When the application is running, the phone line's state can change. To follow these changes, we need to listen to this change event:
phoneLine.RegistrationStateChanged += phoneLine_PhoneLineStateChanged;
When the phone line has been created, we have to call the RegisterPhoneLine() method to register the phone line with the softphone. If the registration is set to required, this method will also send the SIP REGISTER command. We just need to use the following line:
softphone.RegisterPhoneLine(phoneLine);
What events should be handled by the softphone?
In this example, we are using only one: the phone line's event. The phone line can be in several states, for example:
- Error: occurs when registration is needed but could not be made. The phone is unable to communicate through the PBX, or another error has occurred.
- NotRegistered: occurs when the phone is not registered to the PBX, or has already been unregistered.
- NoRegNeeded: there is no communication with the server until the first call is made. If we entered any invalid information when creating the SIP account, we won't even be able to make that call. Since our softphone is not registered with the server, we cannot receive any calls, even with a valid SIP account.
- RegistrationSucceeded: occurs when registration is needed and succeeds. The phone is able to receive and make calls.
There are more states as well, but we will use only these four in this example. The use of these states will be introduced in the Program.cs chapter.
What is Program.cs used for?
This class introduces the usage of a softphone object, handles the console events, interacts with the user, and uses the opportunities provided by the Softphone class. In this example, the softphone can only register to a PBX using the values given by the user.
First of all, we must create a softphone object.
static Softphone mySoftphone;
We handle everything with separate methods. These methods communicate with each other, making the source code more understandable and reusable.
How to initialize the softphone?
The first step is to initialize the softphone we have just created. To do this, we need to call an initializer method with the following lines:
mySoftphone = new Softphone();
mySoftphone.PhoneLineStateChanged += mySoftphone_PhoneLineStateChanged;
Call this method in the Main() method. Now there is a new softphone available to use, and it is already tracking the phone line's states. We will see how to handle the states below, after we are done with the welcome message and the registration process.
How to show a greeting message?
In a few lines, we introduce the application to the user. It's best to describe the functions that are available to use. After our softphone has been initialized, call this method to introduce the application in the Main() method.
How to create a SIP account from the user's input and register to a PBX
As we saw in the Softphone class, we need a SIP account to be set before the softphone can be used for communication. We ask the user to enter valid values to create a SIP account and attempt to register to a PBX. This procedure is done with simple commands, like:
Console.WriteLine();
Console.ReadLine();
In the example's source code, you can find a Read() method. Using that method, we can decide whether the requested information must be entered by the user (so we need to ask for it again and again), or whether we can use a default parameter instead.
You can create your own procedure to get the necessary values from the user. The example shows only one possible way to do it. Once the user has set up the account, this method starts the registration process. The result of the registration will change the phone line's state, so the next steps will be handled in that chapter. We should call this method in the Main() method, after the greeting.
How to handle the phone line states?
We are subscribed to be notified whenever the phone line's state changes. In the mySoftphone_PhoneLineStateChanged method, we can set what to do for each state, if we want to. In this example, we handle four states. If the registration was unsuccessful, we ask for user input again (by calling the correct method for that purpose). The states for this case are:
RegState.Error
or
RegState.NotRegistered
The "RegistrationFailed" state occurs when the registration is simply unsuccessful, for example, if the user set up an invalid SIP account to register with. The "RegistrationTimedOut" state occurs if the registration request takes too long. In this case, we can programmatically retry until it succeeds, or ask the user to create a new SIP account.
If the registration has succeeded or there is no need for registration, we notify the user about it. Please note that if there is no need for registration but we cannot reach the PBX (or we can, but with an invalid SIP account), we won't notice this until we make our first call. The states to use:
RegState.RegistrationSucceeded
RegState.NoRegNeeded
In the next examples, we will work with our softphone once the registration is successful, but in this example, it's enough to notify the user about the successful connection.
What is BlockExit() used for?
You can see a method called BlockExit() in this Program.cs file. This method's job is to prevent the application from exiting, so we can register (or, in later examples, make or receive calls) for as long as we want to. You can write other solutions to solve this, but you won't need anything like this if you are working with Windows Forms applications.
Debug SIP registration events in Asterisk
The following video shows how to debug SIP registration events directly in the Asterisk console.
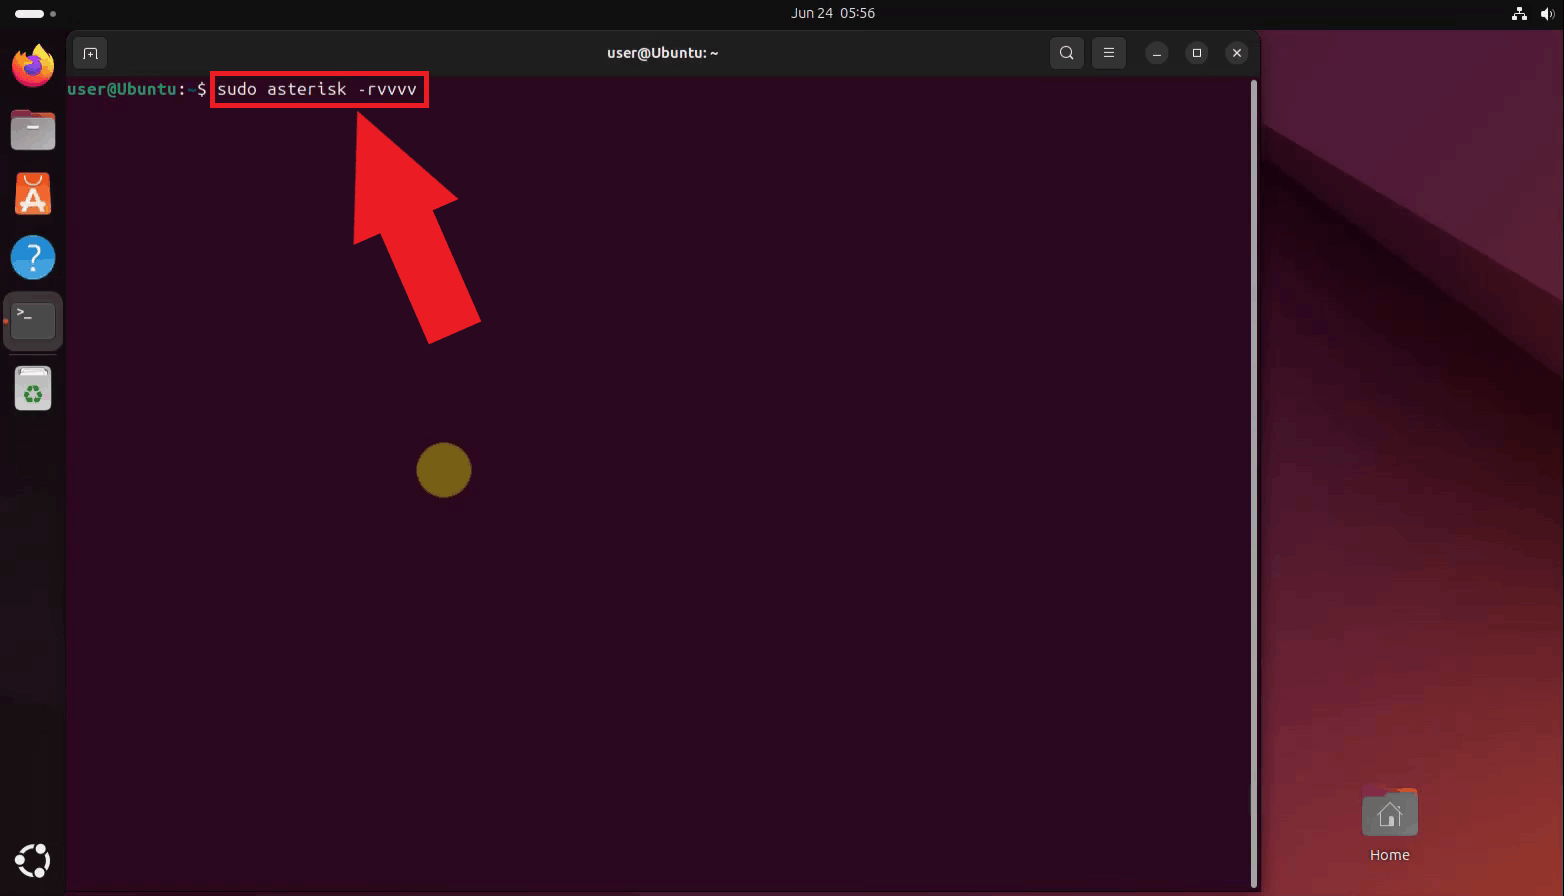
Connect to the Asterisk console with verbose logging enabled (Figure 3). This opens an interactive CLI where SIP events, such as registration attempts, are printed as they happen.
sudo asterisk -rvvvv
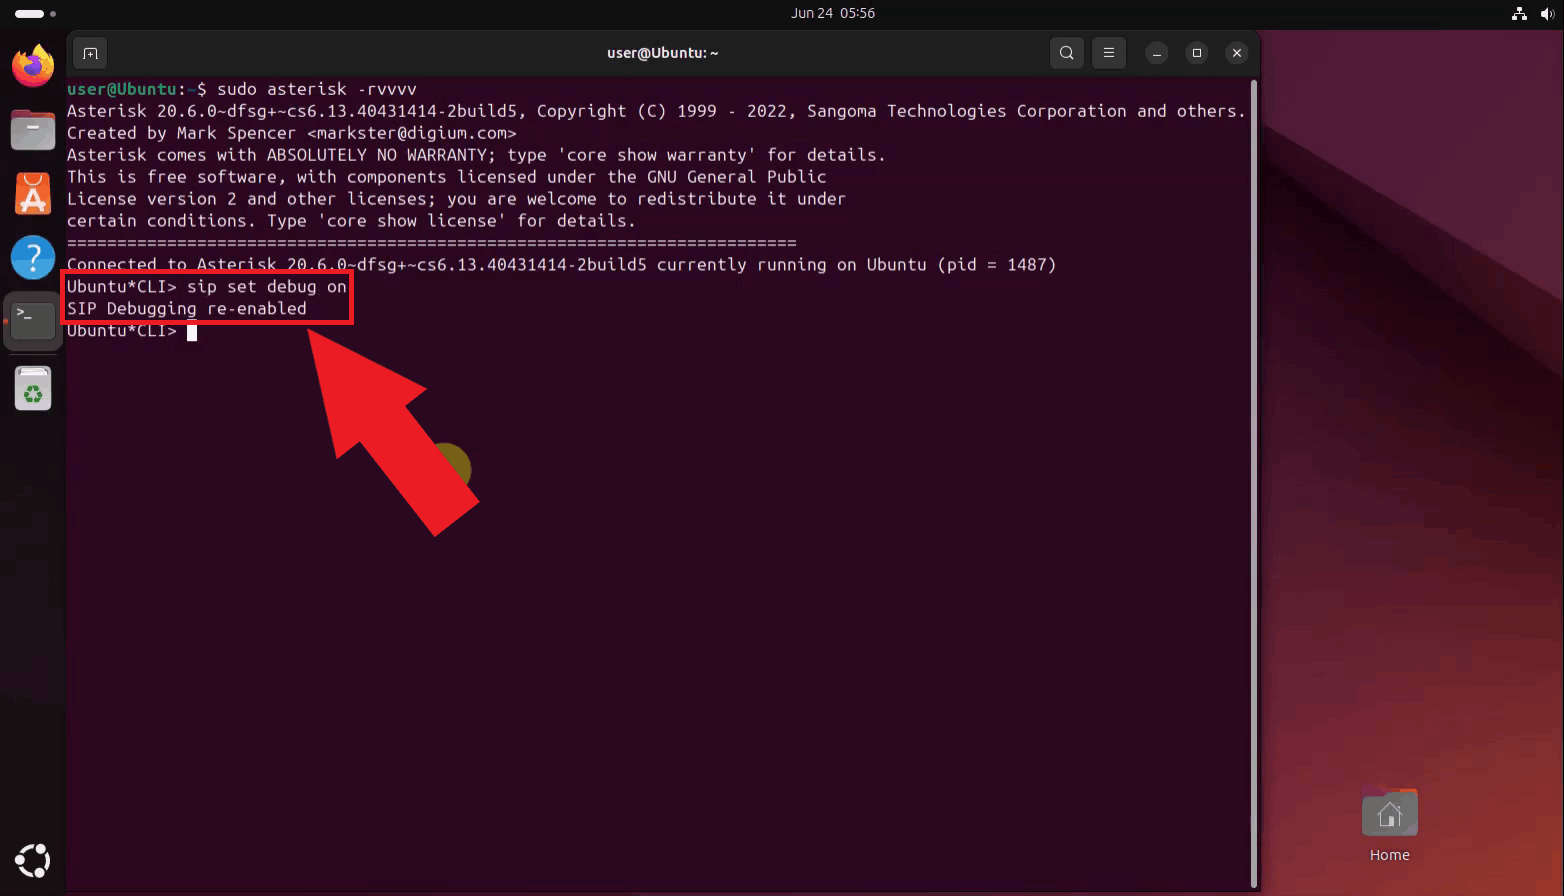
Enable SIP debugging to print the full contents of every SIP message Asterisk sends or receives (Figure 4).
sip set debug on
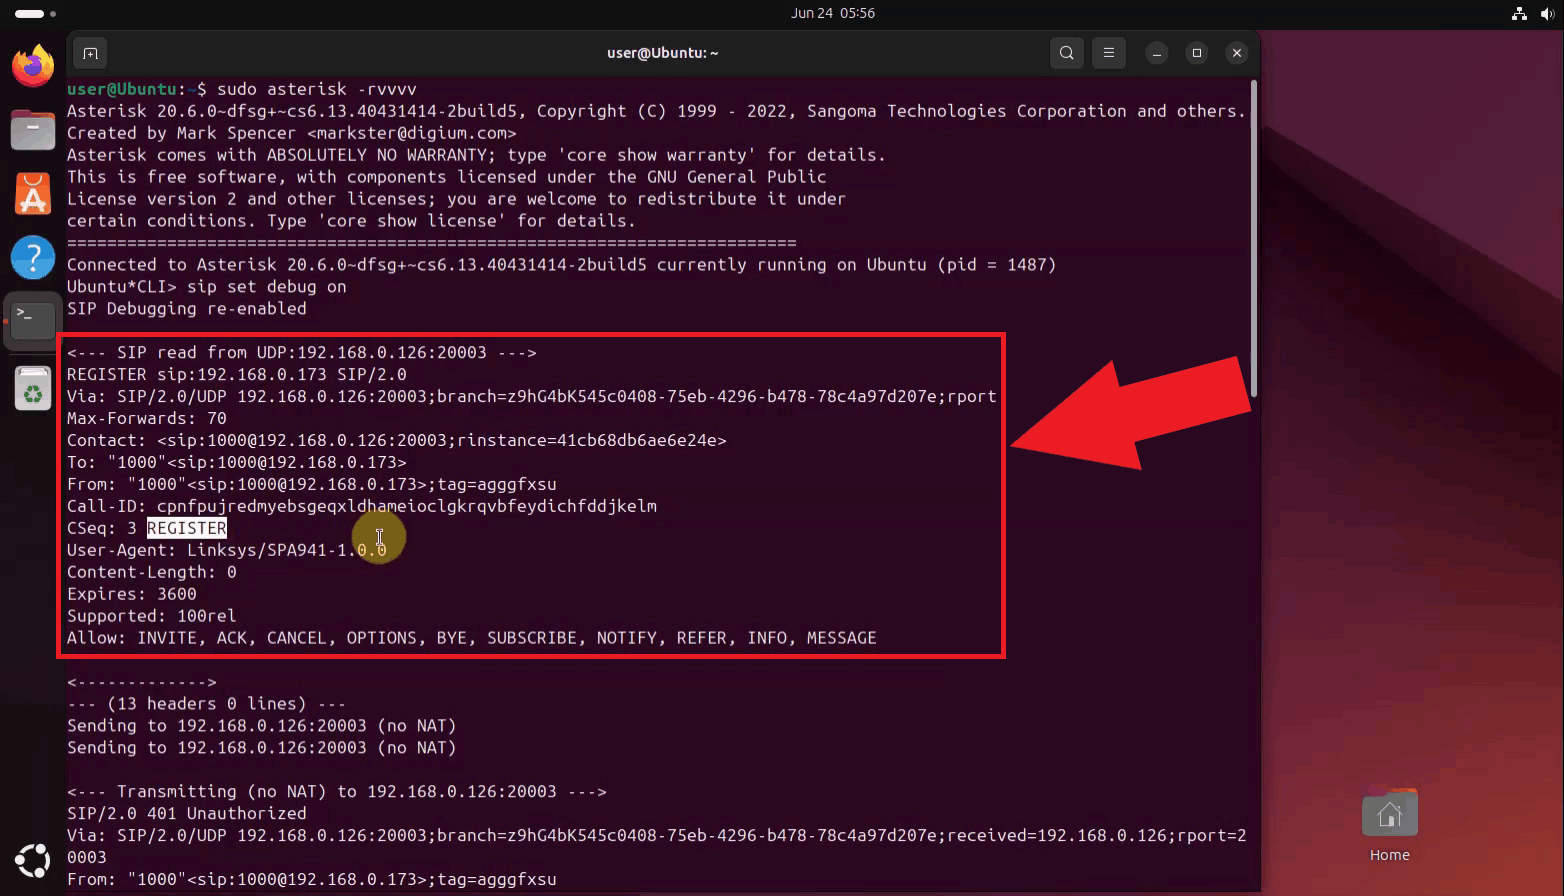
Register your softphone and watch the registration exchange appear in the console (Figure 5). The first REGISTER request is rejected with a 401 Unauthorized response, which is expected: this is Asterisk issuing a digest authentication challenge, not a failure. The softphone then automatically resends the REGISTER request with the correct credentials included, which Asterisk accepts.
Capture SIP registration traffic with Wireshark
The following video shows how to use Wireshark to capture and inspect SIP registration traffic.
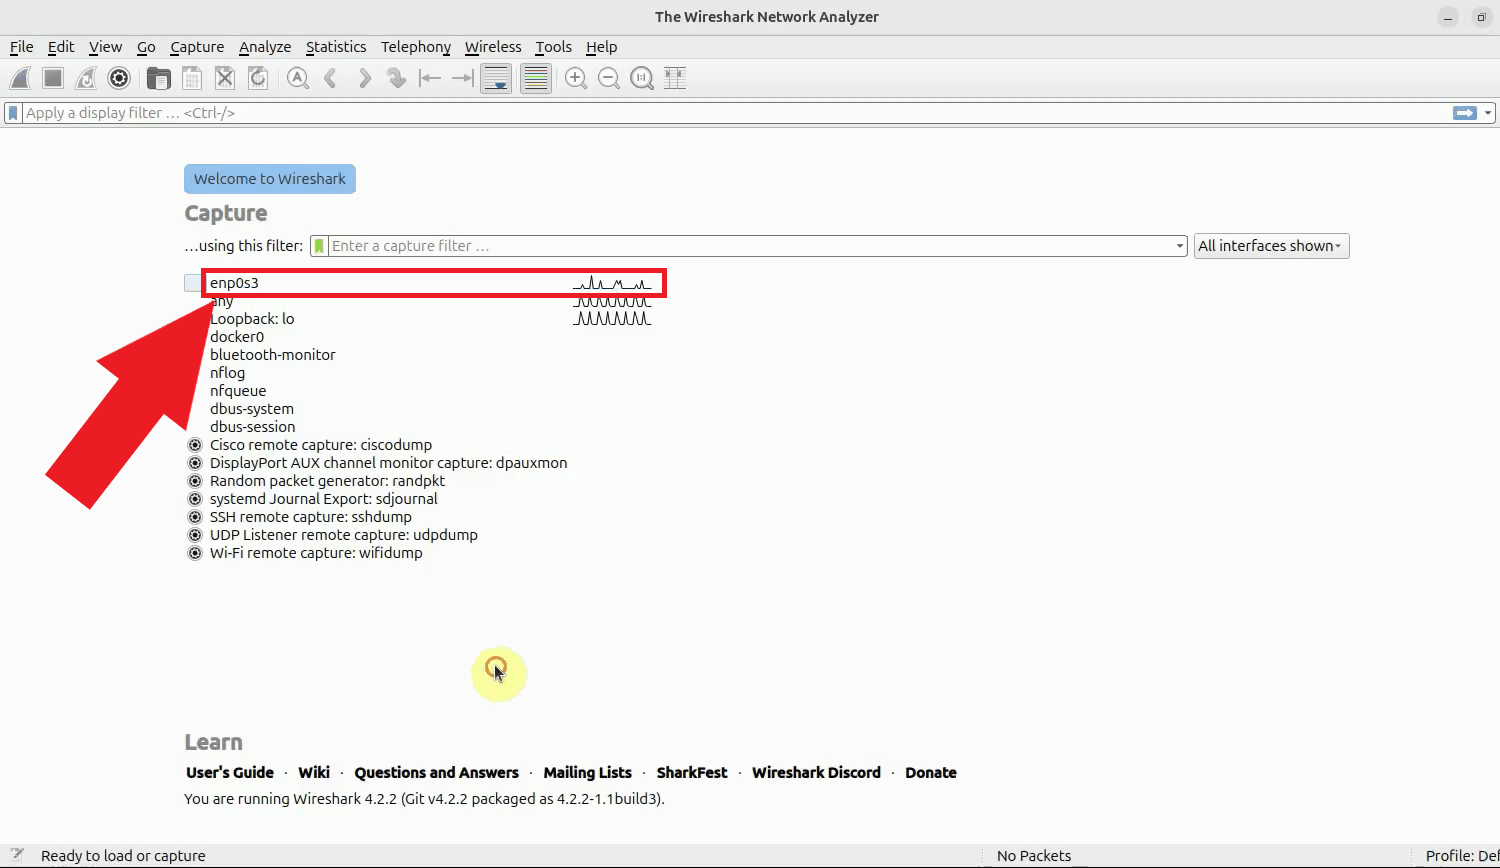
Open Wireshark and start a capture on the network interface used for SIP traffic (Figure 6).
In this example, that is the enp0s3 interface, but yours may be named differently
depending on your system.
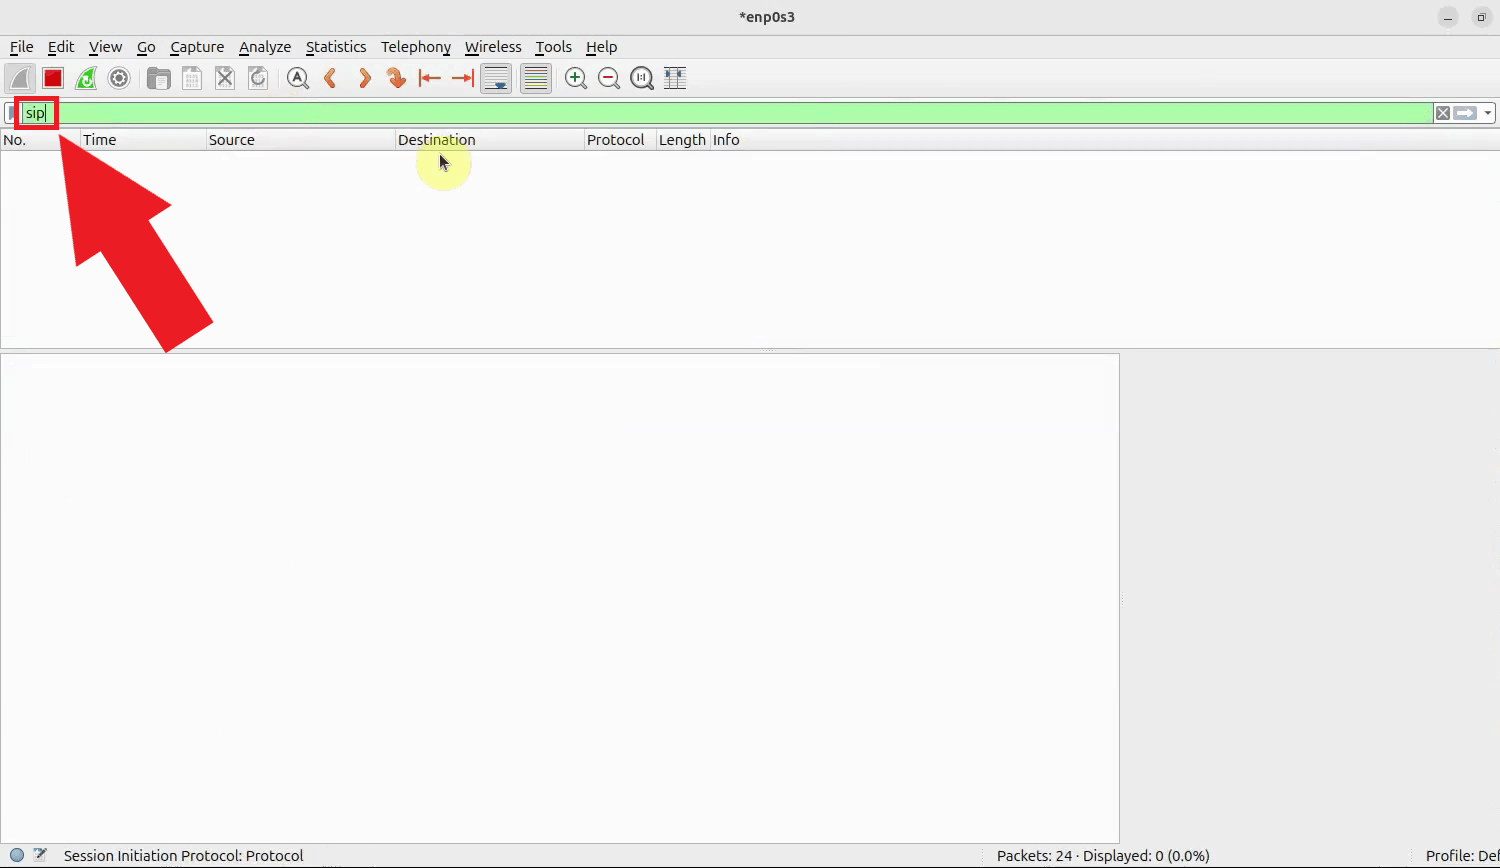
Apply a display filter for sip to hide all unrelated traffic and only show SIP
packets (Figure 7).
Once the softphone registers, Wireshark captures the REGISTER request, the 401 Unauthorized challenge, and the follow-up REGISTER with credentials (Figure 8). Selecting a packet shows its full SIP message structure in the detail pane below the packet list, including the request line, headers, and authorization data.
Selecting the final response packet shows the 200 OK message that Asterisk sends back once the credentials are accepted (Figure 9). This confirms that the registration was successful, directly from the captured network traffic rather than relying solely on the softphone's own reported status.
Summary
After reading this documentation and studying the source code, we must be familiar about how to add reference to the Ozeki VoIP SIP SDK, how to create a Softphone class which provides a softphone object to the user with the input setups. We have a console window which is interacting with the user and handling our softphone with the provided opportunities.
Beyond building the softphone itself, you have also seen how to confirm that registration is working correctly by watching the SIP REGISTER exchange in the Asterisk console and capturing the same traffic with Wireshark, giving you two independent ways to verify your softphone's behavior at the protocol level.