
How to control calls using SIP messages
 |
Download: | call-control.zip |
This example continues to develop the softphone built in the previous tutorials, adding the ability to control an active call using the Ozeki VoIP SIP SDK. You will learn how to put a call on hold and take it off hold, transfer a call to another extension, hang up, and redial the last number, all by triggering the correct SIP re-INVITE and BYE sequences through the SDK's call object.
Why do we need call control?
Being able to make and accept a call is only the starting point of a functional softphone. Real-world telephony requires more than just connecting two parties: callers need to put a conversation on hold while handling something else, transfer a call to a colleague without ending the session, or hang up and immediately redial if a connection drops. Without dedicated call control logic, a softphone can only establish and end calls, making it too limited for any serious business or development use case. Call control is what turns a basic SIP endpoint into a practical communication tool.

What is call control?
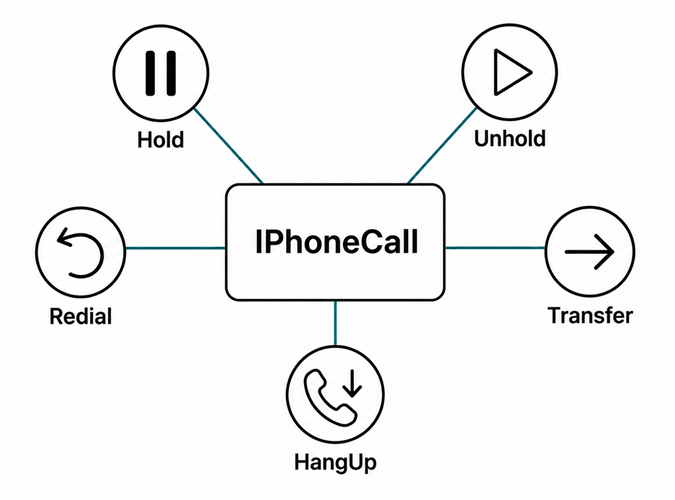
Call control refers to the set of actions that can be performed on an active SIP call beyond simply answering or hanging up. In Ozeki VoIP SIP SDK, call control is implemented through methods on the IPhoneCall object: Hold() sends a re-INVITE with an inactive media direction to pause audio, Unhold() restores it, Transfer() sends a REFER message to redirect the call to a new extension, HangUp() sends a BYE to terminate the session, and calling Start() again after storing the last dialed number implements redial.
How does it work?
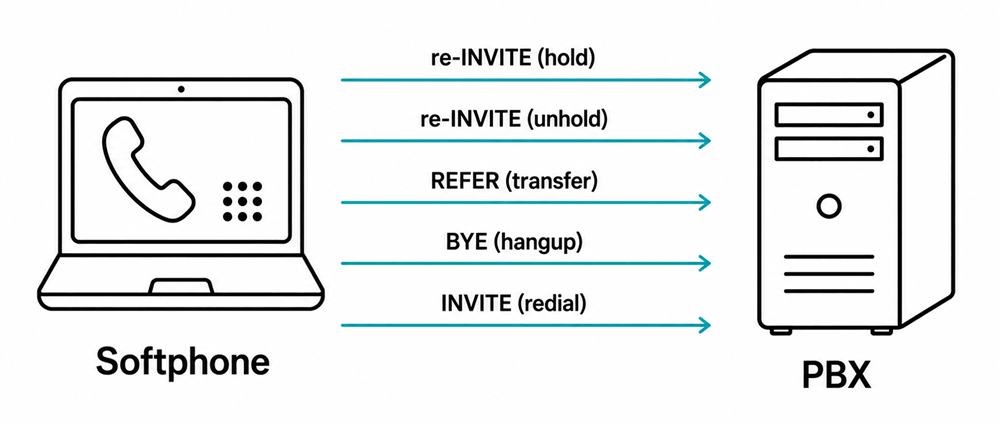
The diagram below shows how the five call control operations map to SIP signaling events between the softphone and the PBX. Hold and Unhold each send a re-INVITE with a modified SDP media direction, which the PBX acknowledges with a 200 OK before the softphone confirms with an ACK. Transfer sends a REFER message pointing to the target extension, and the PBX handles routing from there. HangUp sends a BYE, which the PBX acknowledges with a 200 OK, and Redial simply starts a new INVITE to the previously dialed number once the session has ended.
How to build and run your solution
The following video shows how to open the call control example in Visual Studio and run it. It covers loading the solution file and launching the console application. Once running, the program presents a list of control options — hold, unhold, transfer, hang up, and redial — so you can try each one against a live call registered to the Asterisk PBX.
How to test the solution
To test the call control solution, register the softphone to your PBX with valid SIP credentials and place a test call from another extension or device. During the call you can put it on hold and confirm the audio pauses, resume it, and perform a blind transfer to a third extension. The console output reflects each state change as the IPhoneCall object transitions through Answered, OnHold, InCall, and Completed states, confirming that the control logic is working correctly.
Capture SIP traffic with Wireshark
The following videos show how to capture and inspect the SIP message exchanges for three
key call control operations in Wireshark. Apply a sip display filter after
starting the capture to isolate SIP packets, then trigger each operation from the softphone
to watch the corresponding messages appear in the packet list in real time.
Hold call
This video shows the re-INVITE sent when the call is placed on hold, with the SDP media direction set to inactive, followed by the 100 Trying and 200 OK responses from the PBX.
Forward call
This video captures the REFER message sent to redirect the call to a new destination, along with the ACK that confirms the forwarding instruction was received and processed.
Hangup call
This video shows the BYE request sent when the call is terminated and the 200 OK response from the PBX, confirming that the dialog has been fully released on both sides.
What knowledge would you need?
To fully understand this guide, you might need to study the following chapters first:
-
SIP registration: you can learn how to begin softphone developing and how to be able to register to a pbx with a sip account.
Learn more... -
Managing media handlers: you can find here examples and a simple guide about how to be able to use, connect and manage different media handlers,
and how can you attach them to calls.
Learn more... -
Making and accepting calls: from this guide you can learn how can your softphone make and accept calls, and handle the calls' states.
Learn more...
Please note that, only the softphone's new elements will be introduced here. You can find the registration's process and the needed elements for that at the first example, called "SIP Registration". You can find how to make and accept calls, how to begin to handle the call's states in the second example, called "Making and accepting calls".
Key source code
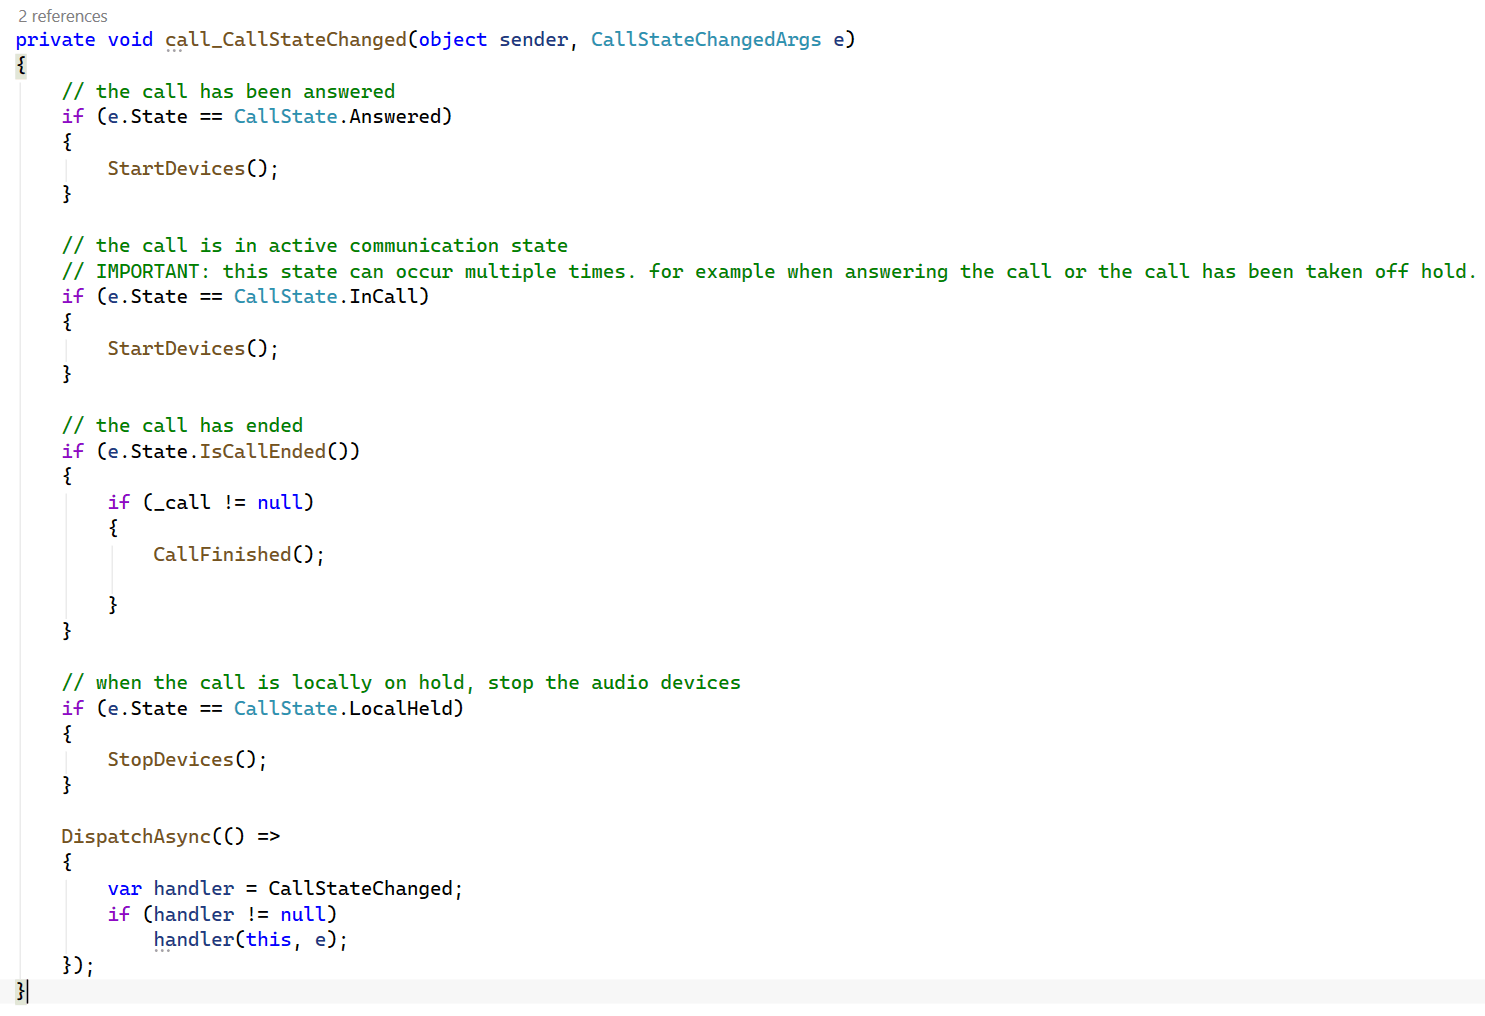
This snippet shows the call state handler in Softphone.cs, which is the central piece of logic in this example. It reacts to every state change on the active call object: when the call is answered it starts the audio devices and attaches the media sender and receiver; when it is put on hold it stops the devices without detaching them; when it returns to an active state it starts them again; and when the call ends in any state it stops the devices, detaches the media handlers, unsubscribes from the call's events, and sets the call object to null so the softphone is ready for the next call.
Source code analysis
To understand the source code, the softphone's functions and their usage, we need to discuss the details.
What is Softphone.cs used for?
This class is used to introduce how to declare, define and initialize a softphone, how to handle some of the Ozeki VoIP SIP SDK's events and how to use some of that's functions. In other words, we would like to create a "telephone software", which has the same functions (or much more), as an ordinary mobile (or any other) phone. In the Program.cs class we will use this class to create a new softphone, so we can use the functions, we can listen to the events placed here. Please note that, this softphone is not able to accept calls. That function is removed in purpose to reduce the code's size, and to be more understandable. We have no new objects or variables to introduce in this example.
How to handle the call's states?
There are some changes in the method which handles the call's states. We are attaching the media handlers to the call object only once, so the ideal state to do this is the "Answered" state, since it occurs only once per a call.
mediaReceiver.AttachToCall(call);
mediaSender.AttachToCall(call);
When the call's state is "LocalHeld", we are stopping the devices. Please note that, if the call is being taken off from hold, then we'll enter into the "InCall" state (again), so we need to start the devices there as well. Since the call can enter into the InCall state several times during a call, this is the reason why we are attaching the media handlers at the "Answered" state.
Please also note that, the hold function notifies the other client to do not send data (in our case: do not talk into the microphone). In the most of the cases we do not want our voice to be heard either by to other party, while we are holding the call, so we don't need the microphone or the speaker either, this is the reason why did we stop them.
How to put the call on hold, and take off from hold?
In this method, we are checking first, if we have an active communication or not (is the call object "null" or not), then we can start to handle the "holding"/"unholding" process. If there is an active call and we call this method, there can be two cases: if the call is in not in "LocalHeld" state, that means we haven't put the call on hold yet, then we put the call on hold. If the call is in the "LocalHeld" state, then it indicates that we are already holding the call, so we take the call off hold. We can do it with checking the call's state and using the commands , introduced below:
call.Hold();
call.Unhold();
But the simplest way to do this:
if (call != null)
{
	call.ToggleHold();
}
As we can see, with the ToggleHold() method we do not even need to check the call's state, or store/check if the call is held or not. This method does the work for us.
How to hang up the call?
We are talking about a really simple function.
if (call != null)
{
	call.HangUp();
	call = null;
}
If the call exists, we just need to use the call object's HangUp() method, and then to set the call object to "null".
How to transfer the call?
Another very simple function, when we would like to transfer the call to an other destination, to an other client, there are several ways to do this, for example we can transfer the call with one of the BlindTransfer() or the AttendedTransfer() methods, or we can forward the call with the ForwardCall() one.
- BlindTransfer(): using this during a call, the third party's phone starts to ring, like it would be dialled first, and not ours. When the third party answers the call, we are stepping out from that.
- AttendedTransfer(): using this during a call, we can notify the third party about the incoming call by calling it, and then redirect the call.
- ForwardCall(): without answering the call, we can set the softphone to redirect the incoming call to an other destination. (For example: if we leave our office, we can forward the office's phone's incoming calls to our mobile phone.)
This example uses the BlindTransfer() method for this purpose.
if (call != null && !string.IsNullOrEmpty(destination))
{
	call.BlindTransfer(destination);
}
This example uses the BlindTransfer() method for this purpose. As we can see, we are checking first, if the destination has been set, and of course we can only transfer an existing call. After that, we are using the call object's BlindTransfer() method with the other client's number as a string parameter.
What is Program.cs used for?
This class will introduce the usage of a softphone object, handles the console events, interacts with the user, and uses the opportunities provided by the Softphone class. In this example, the softphone asks the user for a number to dial, and for a number to transfer the call to. The application guides us through the following steps:
- Asks the user for two numbers (to call, and to transfer to)
- Waits for a key to be pressed to take the call on hold
- Waits for a key to be pressed to take the call off hold
- Takes the call off hold, than hangs up the call when press any key
- Waits for a key to be pressed, than it redials the last called number
- When the call is being answered, press a key and it's being transferred to the other number, given by the user.
We are handling everything with separated methods. These methods are communicating with each other, and making the source code more understandable and reusable.
How to initialize the softphone?
This example is using three new string variables, we need to initialize them to empty:
numberToTransfer = string.Empty;
numberToCall = string.Empty;
exampleSteps = string.Empty;
The numberToCall is the phone number to dial first, and then, to redial when we need to. The call will be transferred to the numberToTransfer phone number. The exampleSteps variable will guide us through the call events. We need this variable, since we would enter into the same states several times and that would cause troubles in the guiding. We can also follow the user interacts (it is mostly automatized this time) with the help of this variable by writing the user events to the console.
How to handle the call's and the guide's states?
The user is being guided through states by only pressing a few keys. For the guide we need to handle the call's actual state and the exampleSteps variable's value:
- The first case, when the call is in "Answered" state and the variable's value is "Calling". In this case, the softphone puts the call on hold, and sets the variable to "Held".
- The call enters to "LocalHeld" state, sets the variable to "Unheld" and takes the call off hold, when the user presses a button.
- The call enters to "InCall" state (again), and if the variable is "Unheld", changes that to "HangedUp" and hangs up the call.
- The call enters to "Completed" state, and if the variable is "HangedUp", changes that to "Redialed", and waits for a key to be pressed. If that happens, it redials the last called number.
- When the other phone answers the call, it enters into "Answered" state, and if the variable is "Redialed", the call is being transferred to the other phone number immediately. The variable's value is also changed to "Transfering".
By writing the exampleSteps variable's value to the console, we can see what would happen, if a real user would use these functions, actions.
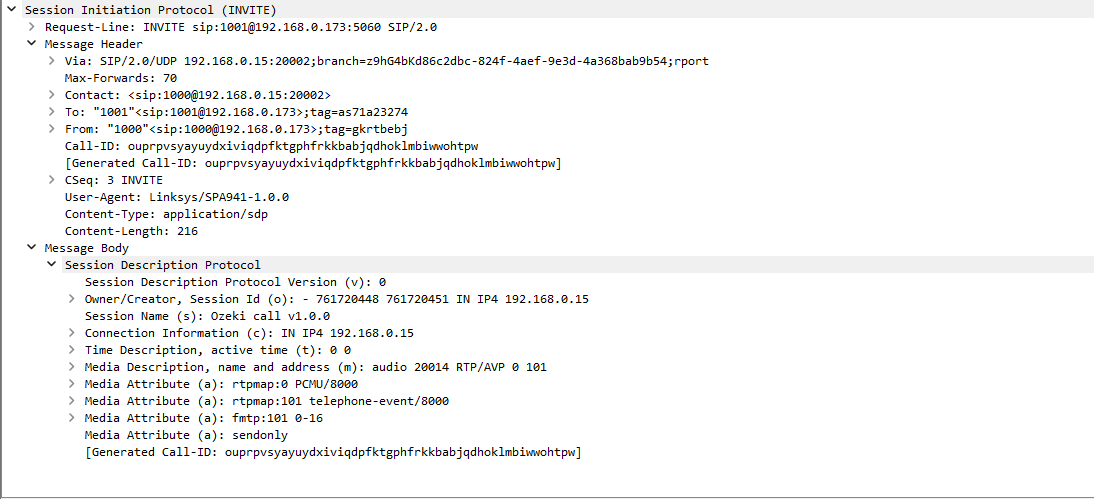
SIP Hold PDU
When a call is placed on hold, the softphone sends a re-INVITE to the PBX with the SDP
media direction set to inactive. This tells the remote side to stop sending
audio without tearing down the session, keeping the dialog alive so it can be resumed with
another re-INVITE later.
SIP Blind Transfer PDU
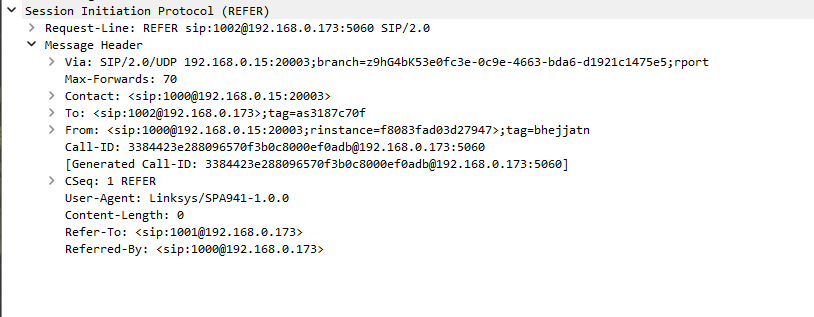
A blind transfer is initiated by sending a REFER message to the PBX with the target extension's address in the Refer-To header. The PBX acknowledges with a 202 Accepted, takes responsibility for reaching the target, and sends NOTIFY messages back to the softphone to report the progress of the new call leg being established.
SIP Attended Transfer PDU
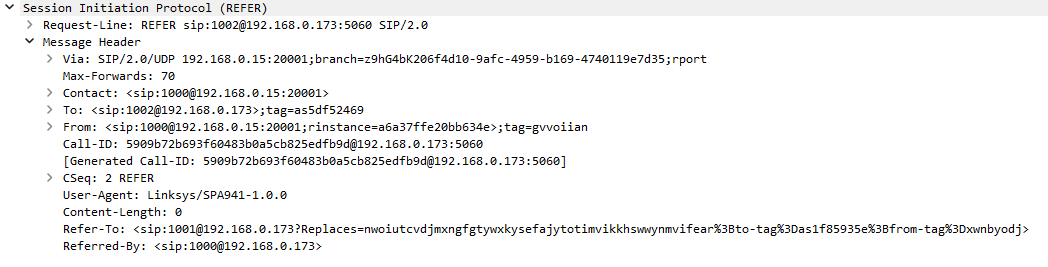
An attended transfer starts by placing a second INVITE to the transfer target while the original call is held. Once the target answers and the transferring party has spoken to them, a REFER is sent that references this second dialog in the Refer-To header, instructing the PBX to replace the original call with the new leg and connect the two other parties directly.
SIP Bye PDU
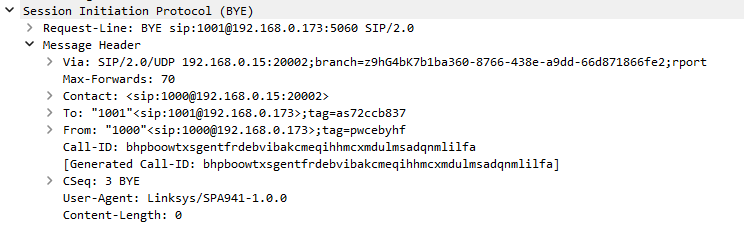
Hanging up sends a BYE from the softphone to the PBX, which replies with a 200 OK to confirm that the session is fully terminated. The softphone's call state handler reacts to the resulting Completed state by stopping the audio devices, detaching the media handlers, and setting the call object to null so the softphone is ready for the next operation.
Debug SIP events in Asterisk
The following video shows how to observe the call control SIP events directly in the Asterisk console. It covers connecting to the CLI with verbose logging, enabling SIP debug output, and then triggering hold, unhold, and transfer operations from the softphone to watch the corresponding re-INVITEs, REFERs, NOTIFYs, and BYEs print in real time.
Conclusion
With understanding these examples, it's easy to learn how to control the calls. Please note that, these are only basic functions, You can write your own ones. You can handle more calls simultaneously, play audio files into the call as voice (like the hold function does it), you can create message recorder, IVR (Interactive Voice Response) etc.
You can also learn how to send Instant Messages, by continuing to develop the "SIP Registration" example:
If you have any questions or need assistance, please contact us at info@voip-sip-sdk.com