C# VoIP Softphone Video Tutorial Part 1
SIP Registration
 |
Download: | ozeki-voip-sdk-tutorial-sip-register.mp4(Tutorial part 1) |
This video demonstrates the first steps concerning to how to build a softphone by using Ozeki VoIP SIP SDK. This tutorial is the 1. part of a 3-part video tutorial series, in which you can learn how to download and install Ozeki VoIP SIP SDK, then how to create a new Visual Studio project and write the source code (including creating softphone objects, initializing them, creating necessary events, executing SIP registration, checking the results etc.).
You can follow the video tutorial series, by starting with the first of them:
| Tutorial Part 2 - Next steps(Tutorial part 1) |
Step 1 - Downloading and installing Ozeki VoIP SIP SDK
To be able to use Ozeki VoIP SIP SDK, you have to download it from the website, and you also have to install it to your computer.
During the downloading process, you will be asked about:
- Your name: your full name
- E-mail: your e-mail address, where the support team of Ozeki will be able to reach you, in purpose to help you with your questions or problems.
- Why do you need this software: we would like to know about the reason of the usage of the SDK, since we would like to be notified about what features, opportunites should we provide in the future, what are the purposes of the users.
After providing the necessary informations, you will be able to download the SDK's installer, called "Ozeki_VoIP_SDK".
During the installation of the SDK, the installer will ask you about the installation's folder. It's recommended to do
not modify the default path, but even if you do, make sure you will remember it, since you will need to use this path later.
After the installation is complated, you are ready to open a new Visual Studio project.
Step 2 - Opening new Visual Studio project
To create a new Visual Studio project, you have to start Visual Studio, than click on the File menu, and select the New menu's Project submenu.
A new window appears, where you have to select Visual C# from the available Templates, and you need to select the
Windows Form Application option.
It's also recommended to rename your project to something more familiar, like this example renames it to "MyFirstSoftphone".
Step 3 - Adding reference to VoIP SIP SDK
If you would like to be able to use the tools provided by the SDK, you will need to follow these steps:
-
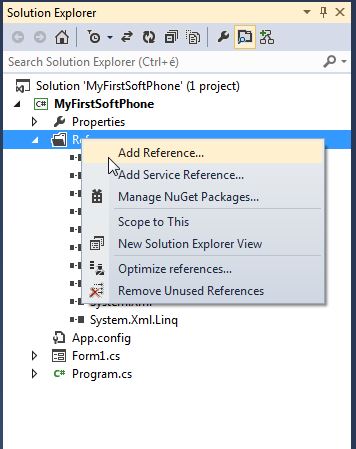
in the Solution Explorer, right lick on the References folder and choose the Add Reference... option:
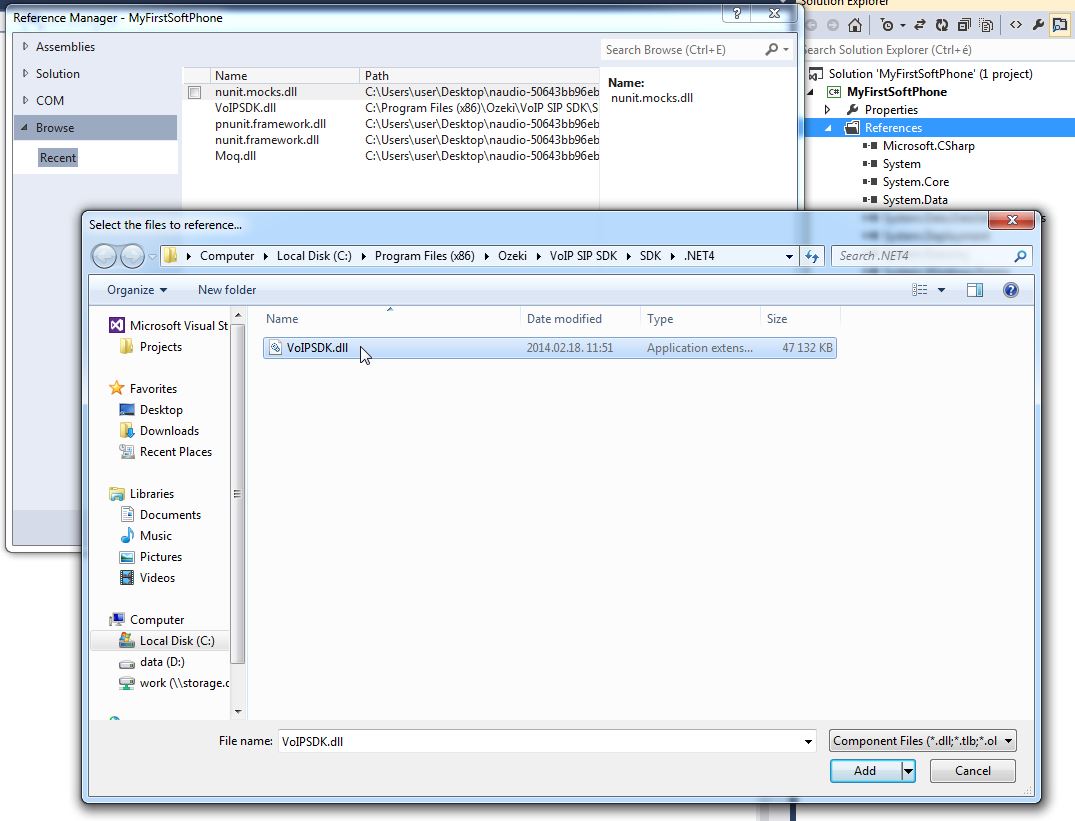
- ozeki.dll file, within the installation path, which is "C:\Program Files (x86)\Ozeki\VoIP SIP SDK\SDK\.NET4" by default.
- after ozeki.dll is located, select that, and click on the Add button, and close the Reference Manager window as well.


After you've done the previous steps, you should be able to see a new entry at the end of the References in the Solution Explorer: VoIPSDK.
Step 4 - Adding log window to the GUI
For the purpose to be able to follow the events' results, navigate to the Design View, first. You can find this view by clicking on the View menu,
than selecting the Design View submenu. From the Toolbox, drag and drop a new ListBox onto your Form.
Please note that, you might need to incrase the size of the form, to make some space for later works.
The application will put the event results into the ListBox as new items. It's recommended to rename the ListBox (and every GUI element) to something more familiar, for example; the guide renames it to "lb_Log".
Step 5 - Adding extra lines into the using section
For this step, you have to switch to the Code View. If you can't see the correct tab for that, click on the View menu, and select the Code submenu.
You have to add some extra lines to the using section, if you would like to use the tools Ozeki VoIP SIP SDK Offers, as they were in the same namespace. Without these lines, you would have to use the namespace information as a label for all tools of the SDK:
using Ozeki.Media.MediaHandlers;
using Ozeki.VoIP;
using Ozeki.VoIP.SDK;
Step 6 - Defining the main tools for the softphone
There are several new objects and variable, which will be used by the softphone:
- ISoftPhone softPhone: the softphone object from the ISoftPhone interface
- IPhoneLine phoneLine: the phone line object from the IPhoneLine interface. To set a phone line, you need to set a valid SIP Account and NAT Configuration (see below).
- PhoneLineState phoneLineInformation: you can follow the phone line's states (registered, timed out, registration failed etc.), and you can set different methods to be executed in thoses cases.
- IPhoneCall call: the application manages the calls as objects.
- Microphone microphone: microphone object to capture audio data from microphone. It's also initialized with the default microphone device, by using the GetDefaultDevice() method of the Microphone class.
- Speaker speaker: speaker object to play audio data through speakers. It's also initialized with the default speaker device, by using the GetDefaultDevice() method of the Speaker class.
- MediaConnector connector: this object will create connections between different MediaHandlers, making it available to send voice data from a microphone throught the call, to the other party's speaker, in this example.
- PhoneCallAudioSender mediaSender: this object is used to send audio data to the attached call object.
- PhoneCallAudioReceiver mediaReceiver: this object is used to receive audio data from the attached call object.
- bool inComingCall: a boolean variable which indicates if there is an incoming call or not.
private ISoftPhone softPhone;
private IPhoneLine phoneLine;
private PhoneLineState phoneLineInformation;
private IPhoneCall call;
private Microphone microphone = Microphone.GetDefaultDevice();
private Speaker speaker = Speaker.GetDefaultDevice();
MediaConnector connector = new MediaConnector();
PhoneCallAudioSender mediaSender = new PhoneCallAudioSender();
PhoneCallAudioReceiver mediaReceiver = new PhoneCallAudioReceiver();

private bool inComingCall;
These objects and variables will be initialized a few steps later, at the initialization of the softphone.
Step 7 - Adding a simple method to start a background thread
To handle the GUI (Graphical User Interface), you will need to create a background thread for this purpose. It's a simple method, which invokes the action, given as parameter:
private void InvokeGUIThread(Action action)
        {
            Invoke(action);
        }
You will se how to use this method during the next steps.
Step 8 - Handling the call's states
To get notified about the call's state when that is being changed, the softphone is using the following method, which is being called, when the call object's CallStateChanged event occurs (see below, at Step 9):
private void call_CallStateChanged(object sender, CallStateChangedArgs e)
{
	InvokeGUIThread(() => { lb_Log.Items.Add("Callstate changed." + e.State.ToString()); });
}
This method logs the call's states as new entries to the lb_Log ListBox. You can get the current call state from the e.State's value, by
calling its ToString() method.
You can learn how to handle call states from the second tutorial.
Step 9 (part 1) - Ensure the signing up to the necessary events of a call
With a helper method, you can subscribe to the call object's CallStateChanged event, which will call the previously written call_CallStateChanged() method:
private void WireUpCallEvents()
        {
            call.CallStateChanged += (call_CallStateChanged);
        }
Step 9 (part 2) - Ensure the signing down from the necessary events of a call
When you don't need the call's event anymore, you can unscubscribe from that:
private void WireDownCallEvents()
        {
            call.CallStateChanged -= (call_CallStateChanged);
        }
Step 10 - Initializing the softphone
Within this method, you have to define the most of the previously defined objects, and you will also set how to register your softphone to
a PBX.
Within the InitializeSoftphone() method, you have to do the followings:
-
you have to define the softphone object with the help of the SoftPhoneFactory class's CreateSoftPhone() method.
This method waits four parameters: your local IP address, a minimum and a maximum port, which are defining a port range, and a listening port.
If you have any firewall rule which restricts the usable ports, you can set the usable port range here, which will be used during the calls.
You can also log the softphone's creation to the lb_Log ListBox. - the softphone's IncomingCall event needs a new event handler, which is the softPhone_inComingCall() method in this example:
-
you can create a SIP Account this way:
- registrationRequired: is the registration required or not? This field needs to be set to "true", if you would like to receive incoming calls.
- displayName: a name to be displayed at the called client.
- userName: if an other client dials this name (number), you are getting called.
- authenticationId: an identifier to the PBX, a login name.
- registerPassword: the password to register to the PBX. Works in pair with the authentication ID.
- domainHost: a domain name, an IP address.
- domainPort: Port number.
- to communicate (and to register to the PBX) you need to create a phone line. You've already created the necessary SIP Account, so with this you can create it:
-
when the application is running, the phone line's state can change. To follow these changes, you need to listen to this change event:
You can also add a new entry to the lb_Log ListBox about the phone line's creation.
phoneLine.RegistrationStateChanged += phoneLine_PhoneLineInformation;
-
when the phone line has been created, you have to call the RegisterPhoneLine() method to register the phone line to the softphone.
If the registration is set to be required ("true"), this method will also send the SIP REGISTER command to the selected PBX.
You just need to use the following line:SoftPhone.RegisterPhoneLine(phoneLine);
softPhone = SoftPhoneFactory.CreateSoftPhone(SoftPhoneFactory.GetLocalIP(), 5700, 5750);
InvokeGUIThread(() => { lb_Log.Items.Add("Softphone created!"); });
softPhone.IncomingCall += new EventHandler<VoIPEventArgs<IPhoneCall>>(softPhone_inComingCall);
SIPAccount sa = new SIPAccount(true, "1000", "1000", "1000", "1000", "192.168.115.149", 5060);
InvokeGUIThread(() => { lb_Log.Items.Add("SIP account created! - " + sa.RegisterName); });
phoneLine = softPhone.CreatePhoneLine(sa);
It's also a good idea to insert this method's body into a try block, to be able to catch the occured exceptions.
The InitializeSoftphone() method needs to be called, when the Form loads. In this example, the Form is called "Form1":
private void Form1_Load(object sender, EventArgs e)
        {
            InitializeSoftPhone();
        }
Step 11 - Handling incoming calls
To handle the IncomingCall event, the softPhone_inComingCall() method needs to be implemented:
private void softPhone_inComingCall(object sender, VoIPEventArgs<IPhoneCall> e)
        {
            InvokeGUIThread(() => { lb_Log.Items.Add("Incoming call from: " + e.Item.DialInfo.ToString()); });
        }
In this example, the application only notifies the user about the incoming call, within the lb_Log ListBox. You can see how to work with call objects within the second tutorial.
Step 12 - Handling if the phone line's state changes
You are subscribed to get notified if the phone line's state has been changed. At the phoneLine_PhoneLineInformation() method you can set what to do for each state, if you would like to. In this example the application only notifies the user about the success of the registration, within the lb_Log ListBox:
private void phoneLine_PhoneLineInformation(object sender, RegistrationStateChangedArgs e)
        {
            phoneLineInformation = e.State;

            InvokeGUIThread(() =>
                {
                    if (phoneLineInformation == RegState.RegistrationSucceeded)
                    {
                        lb_Log.Items.Add("Registration succeeded - Online");
                    }
                    else
                    {
                        lb_Log.Items.Add("Not registered - Offline: " + phoneLineInformation.ToString());
                    }

                });
        }
As you can see, if the registration was unsuccessful, the application also tells the reason of that.
Conclusion
From this tutorial you could learn how to begin the softphone developement with Ozeki VoIP SIP SDK, and you can also try your softphone; run the application, and you can see if your softphone registers or not. If you gave valid informations at the SIP Account creation to reach the PBX and you set the correct NAT Traversal method, your softphone should register successfully.
Next tutorial
From the second part of the tutorial, you can learn how to
- connect media devices
- attach MediaHandlers to the call
- create a simple telephone GUI
- listen to GUI events
- make and accept voice calls
