How to record a voice call?
 |
Download: | record-voice-call.zip |
This article is a detailed guide about recording voice calls
in relation with Ozeki VoIP SIP SDK. After reading through this page you
will be fully familiar with all the essential terms concerning voice call recording
and what you will need for creating your own solution using Ozeki VoIP SIP SDK.
To use this example, you need to have Ozeki VoIP SIP SDK installed,
and a reference to ozeki.dll should be added to your visual studio project.
It's also recommended to study the How to accept incoming call
and the How to make a SIP voice call articles.

What is voice recording? What does it used for?
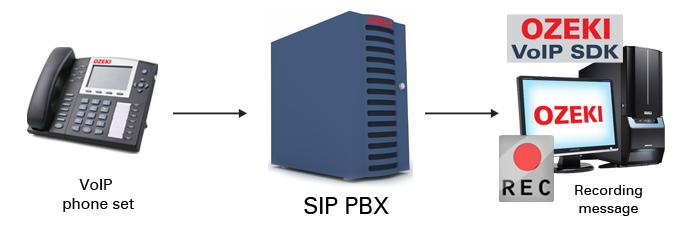
In Voice over IP model the communication is made through the Internet Protocol and the data that is sent between the two end points is digitized. This data can be recorded and saved in audio files if needed (Figure 1).
VoIP phone calls allow voice call recording in more than one ways. You can record only one of the clients' voice, or record both into separate files or even record them into one mixed file. This last solution makes the most sense, so the example will implement this case.
How to implement voice recording using C#?
The call recording is an easy task with Ozeki VoIP SIP SDK even if you need to record both the incoming and the outgoing voices. You only need to extend your softphone application with some extra tools and the recording can be done automatically when you enter into a call.
You can record audio streams into .wav audio files, and for this purpose you will need a WaveStreamRecorder media handler object. If you want to record both parties' voice in one file, you will also need an AudioMixerMediaHandler that will mix the incoming and the outgoing voices. The two extra strings are used for the .wav file name during the recording. The filename specifies the .wav file's name that will be the parameter for the recorder's constructor.
The recording needs to be established when the call is being answered. In this case the recorder needs to be initialized with the filename that will consist of the caller (as string) and the hour, minute and second information of the current time. This file naming convention is necessary for securing the unique file names (per day), as you do not want to overwrite the recorded files.
You need to connect the microphone and the mediaReceiver objects to the mixer. This will ensure that the two audio streams will be mixed. Then you need to connect the mixer to the recorder that will record the mixed audio stream into the file specified by the filename parameter.
The following example will demonstrate how to store an incoming call as wav file. The softphone records both parties' voice, so you can also see how to use a mixer object.
| C# | VB.NET |
using System;
using Ozeki.Media;
using Ozeki.VoIP;

namespace Record_Voice_Call
{
    class Program
    {
        static ISoftPhone softphone;   // softphone object
        static IPhoneLine phoneLine;   // phoneline object
        static IPhoneCall call;
        static string caller;
        static string filename;
        static Microphone microphone;
        static Speaker speaker;
        static PhoneCallAudioSender mediaSender;
        static PhoneCallAudioReceiver mediaReceiver;
        static MediaConnector connector;
        static WaveStreamRecorder recorder;

        static void Main(string[] args)
        {
            // Create a softphone object with RTP port range 5000-10000
            softphone = SoftPhoneFactory.CreateSoftPhone(5000, 10000);

            // SIP account registration data, (supplied by your VoIP service provider)
            var registrationRequired = true;
            var userName = "858";
            var displayName = "858";
            var authenticationId = "858";
            var registerPassword = "858";
            var domainHost = "192.168.115.100";
            var domainPort = 5060;

            var account = new SIPAccount(registrationRequired, displayName, userName, authenticationId, registerPassword, domainHost, domainPort);

            // Send SIP regitration request
            RegisterAccount(account);

            microphone = Microphone.GetDefaultDevice();
            speaker = Speaker.GetDefaultDevice();
            mediaSender = new PhoneCallAudioSender();
            mediaReceiver = new PhoneCallAudioReceiver();
            connector = new MediaConnector();

            // Prevents the termination of the application
            Console.ReadLine();
        }

        static void RegisterAccount(SIPAccount account)
        {
            try
            {
                phoneLine = softphone.CreatePhoneLine(account);
                phoneLine.RegistrationStateChanged += line_RegStateChanged;
                softphone.IncomingCall += softphone_IncomingCall;
                softphone.RegisterPhoneLine(phoneLine);
            }
            catch (Exception ex)
            {
                Console.WriteLine("Error during SIP registration: " + ex);
            }
        }

        static void line_RegStateChanged(object sender, RegistrationStateChangedArgs e)
        {
            if (e.State == RegState.NotRegistered || e.State == RegState.Error)
                Console.WriteLine("Registration failed!");

            if (e.State == RegState.RegistrationSucceeded)
                Console.WriteLine("Registration succeeded - Online!");
        }

        static void softphone_IncomingCall(object sender, VoIPEventArgs e)
        {
            call = e.Item;
            caller = call.DialInfo.CallerID;
            call.CallStateChanged += call_CallStateChanged;
            call.Answer();
        }

        static void call_CallStateChanged(object sender, CallStateChangedArgs e)
        {
            Console.WriteLine("Call state: {0}.", e.State);

            if (e.State == CallState.Answered)
                SetupDevices();

            if (e.State.IsCallEnded())
                CloseDevices();
        }

        static void SetupDevices()
        {
            microphone.Start();
            connector.Connect(microphone, mediaSender);

            speaker.Start();
            connector.Connect(mediaReceiver, speaker);

            filename = string.Format("{0}-{1}-{2}-{3}.wav", caller, DateTime.Now.Hour, DateTime.Now.Minute, DateTime.Now.Second); // a string to generate file name
            recorder = new WaveStreamRecorder(filename);    // new recorder object

            connector.Connect(microphone, recorder);        // connects the outgoing voice to the recorder
            connector.Connect(mediaReceiver, recorder);     // connects the incoming voice to the recorder

            mediaSender.AttachToCall(call);
            mediaReceiver.AttachToCall(call);

            recorder.Start();  // starts the recording
        }

        static void CloseDevices()
        {
            recorder.Dispose();
            microphone.Dispose();
            speaker.Dispose();

            mediaReceiver.Detach();
            mediaSender.Detach();
            connector.Dispose();
        }
    }
}
This example program briefly demonstrated how you can record a voice call by mixing the incoming and outgoing voices together. You can use this code to extend your softphone applications with voice recording support or you can invent it further the way you want to use voice recording.
