How to encrypt calls with SIP encryption?
 |
Download: | sip-encryption.zip |
This article is a brief introduction about SIP call encryption in relation with Ozeki VoIP SIP SDK. After reading through this page you will be fully familiar with all the essential terms concerning SIP encryption and what you will need for creating your own solution using Ozeki VoIP SIP SDK.
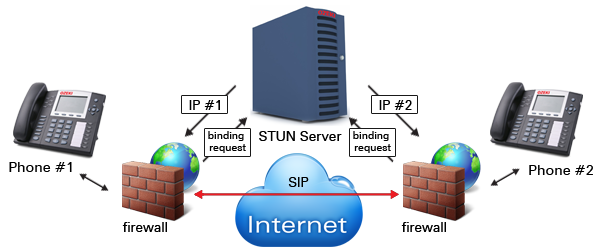
What is SIP encryption?
A Session Initiation Protocol (SIP) connection is a Voice over Internet Protocol (VoIP) service offered by many Internet telephony service providers (ITSPs) that connects a company's private branch exchange (PBX) telephone system to the public switched telephone network (PSTN) via the Internet.
The increasing concerns about security of calls that run over the public Internet has made SIP encryption more popular. Because VPN is not an option for most service providers, most service providers that offer secure SIP connections use TLS (Transport Layer Security) for encrypting the traffic.
How to implement SIP encryption using C#?
Using Ozeki VoIP SIP SDK you can set the transport type at the phone line's creation; to create a phone line, you have to use the CreatePhoneLine() method of the softphone object, which waits at least two parameters: a SIP Account and a NAT traversal method. As a third parameter, you can set the type of the transport to TLS.
If your PBX provider is using certification from an official certification provider which is already
integrated into your operating system (like VeriSign and Thawte), you are allowed to register with TLS.
You can also create your own certifications by using CA (Certificate Authority) systems (like SimpleCA).
Please note that, if you choose to create your own certification, that will be accepted by the
PBX only if you can set within the PBX to accept it.
Step 1 - To create new certification for the PBX, follow these steps:
-
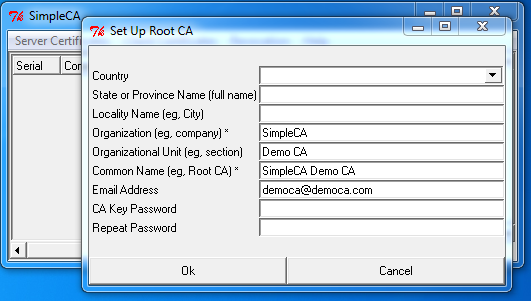
Run the SimpleCA with the SimpleCA.exe file. First, you need to set up a root CA:
-
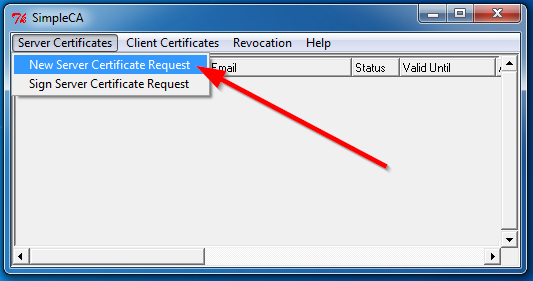
In the Server Certificates menu choose New Server Certificate Request:
-
Within the following form you have to provide some information. Please not that,
within the Common Name field you have to provide the domain name or IP address
of the PBX, where you can reach it:
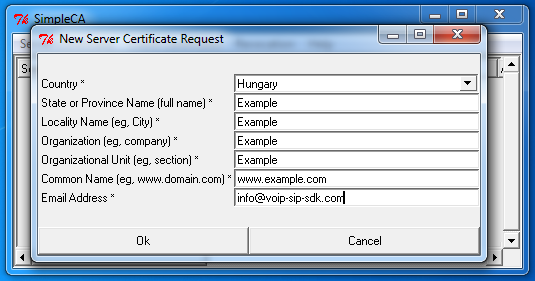
Click on the OK button, than give a name for the Certificate Signing Request, and click on the Save button. -
Now you have an unsigned Server Certificate Request, you just have to sign it.
In the Server Certificates menu choose Sign Server Certificate Request
and select the previously created .csr file:
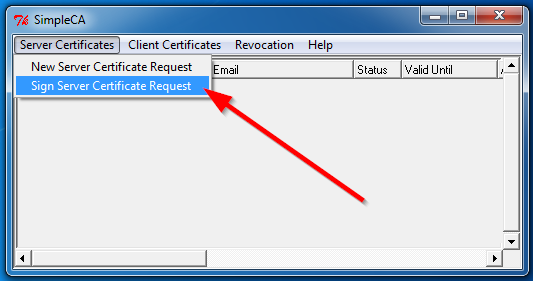
Check the given data and click on the OK button. -
Finally, you will be asked asked about the CA Key Password (which you were set
at the starting of SimpleCA):
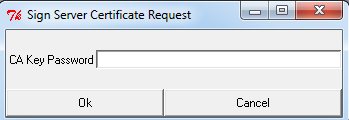
Type in the password, and Simple CA will generate three files into the certificates directory. With the help of these files, you need to set the TLS certification within your preferred PBX.
Step 2 - You can set your new certification at the client's side - where the softphone is - with SimpleCA this way:
-
From the simpleca directory, run the ca.crt file:
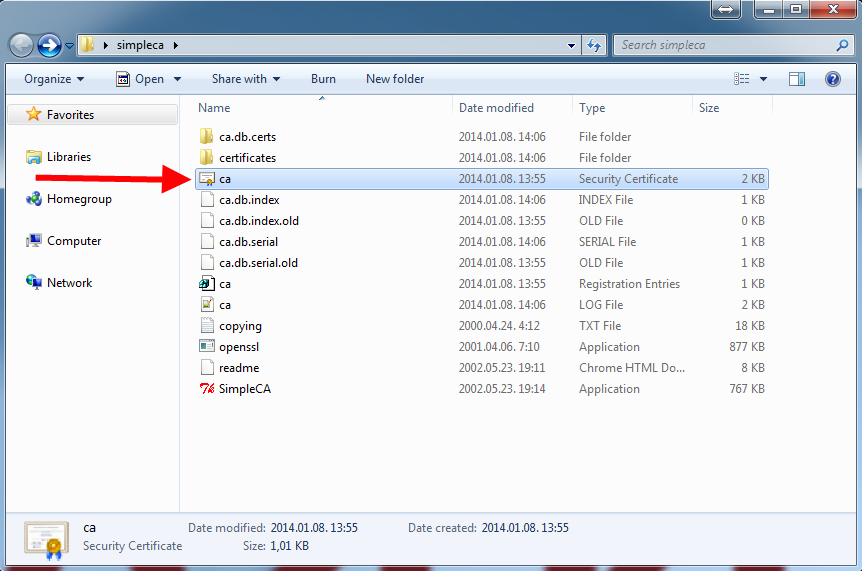
-
Within the General tab, click on the Install Certificate... button:
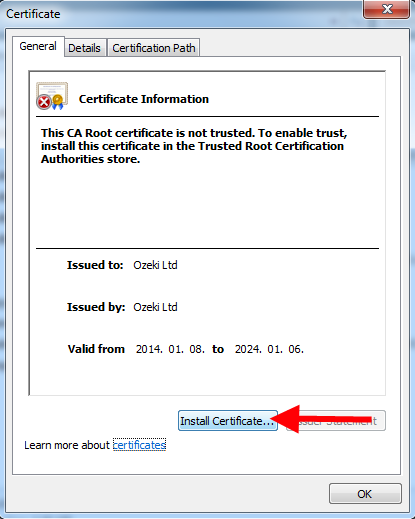
than the Next button. -
Choose the Place all certificates in the following store option,
and clik on the Browse button:
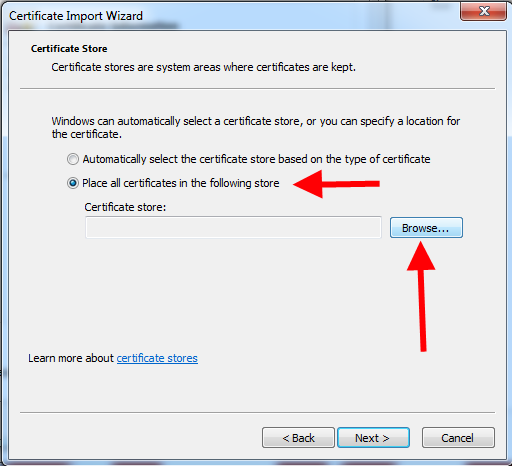
-
Select the Trusted Root Certification Authorities:
than click the OK, the Next, and the Finish button.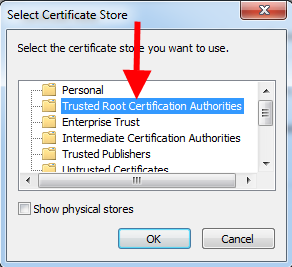
- You will receive a warning message via the Security Warning window as a warning about the certification's installation, and asks you if you really want to install it or not. Click on the Yes button, and you are ready to set the TLS encryption within your softphone (as the following example source code introduces).
SIP encryption example in C#
using System;
using Ozeki.Network;
using Ozeki.VoIP;

namespace SIP_Encryption
{
    class Program
    {
        static ISoftPhone softphone;
        static IPhoneLine phoneLine;

        private static void Main(string[] args)
        {
            // Create a softphone object with RTP port range 5000-10000
            softphone = SoftPhoneFactory.CreateSoftPhone(5000, 10000);

            // SIP account registration data, (supplied by your VoIP service provider)
            var registrationRequired = true;
            var userName = "sipusername";
            var displayName = "sipdisplayname";
            var authenticationId = "authenticationid";
            var registerPassword = "Password";
            var domainHost = "pbxip.voipprovider.com";
            var domainPort = 5060;

            var account = new SIPAccount(registrationRequired, displayName, userName, authenticationId, registerPassword, domainHost, domainPort);

            // Send SIP regitration request
            RegisterAccount(account);

            // Prevents the termination of the application
            Console.ReadLine();
        }


        static void RegisterAccount(SIPAccount account)
        {
            try
            {
                var phoneLineConfig = new PhoneLineConfiguration(account);
                phoneLineConfig.TransportType = TransportType.Tls;
                phoneLine = softphone.CreatePhoneLine(phoneLineConfig);
                phoneLine.RegistrationStateChanged += line_RegStateChanged;
                softphone.RegisterPhoneLine(phoneLine);
            }
            catch (Exception ex)
            {
                Console.WriteLine("Error during SIP registration: " + ex.ToString());
            }
        }

        static void line_RegStateChanged(object sender, RegistrationStateChangedArgs e)
        {
            if (e.State == RegState.NotRegistered || e.State == RegState.Error)
                Console.WriteLine("Registration failed!");

            if (e.State == RegState.RegistrationSucceeded)
                Console.WriteLine("Registration succeeded - Online!");
        }
    }
}