How to build a softphone using Ozeki VoIP SIP SDK
 |
Download: | softphone-example.zip |
This article explains how to develop your first softphone application in 10 easy steps using the powerful Ozeki VoIP SIP SDK. If you follow this guide you will realize how simply you can modernize your company communication with the following solution.
Introduction
Communication is a great matter to consider for every company nowadays. The effectiveness of a company depends on the speed of sending and receiving information to and from the workers and the customers. One minute delay may result in a loss of a customer.
Every company official knows that the most efficient way of communication is using direct communication channels. The easier and more supportive they are, the better.
Software phones provide a lot of possibilities for communication and so they make a clear distinction between winners and losers. Realizing this, you will need to have the best possible solution for softphones to be the best provider in your field, and that is where Ozeki comes in (Figure 1).
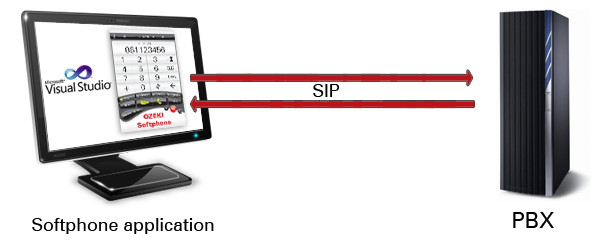
Ozeki provides you a great VoIP SIP SDK with wide support of all needed tools and codecs to make your softphone development as easy as it can be. We give you all the support but let you all the freedom to customize your own software phone. With Ozeki VoIP SIP SDK you will be able to make the best softphone solution for your company needs without doing a lot uncomfortable background programming and setups.
Read through this guide and you will surely realize that the easiest and most effective way of communication is just some basic programming steps away.
If you are reading this page, you have supposedly downloaded and configured the Ozeki VoIP SIP SDK on your computer and you also have a Visual Studio system for C# programming. If you don't have any of them, it is the right time to get them, as this step-by-step guide will be based upon the support these tools provide.
As the SDK provides a great variety of prewritten methods and covers all the necessarily used codec support, the concrete programming will only be some method calls and product customizing.
You will find that with Ozeki VoIP SIP SDK softphone building is one of the simplest tasks you have ever had to do for making your company communication more effective.
Let's see how we create a brand new softphone application with Ozeki VoIP SIP SDK in ten easy steps.10 easy steps to have your own softphone with Ozeki VoIP SIP SDK
We will use C# language to develop our softphone in Visual Studio. You will need to be familiar with the basic C# programming knowledge, nothing too special. With the support that Ozeki VoIP SIP SDK provides, you will find it easy to build the softphone application.
Step 1: Creating a Windows Forms application in Visual Studio
First of all, we should create a new Windows Forms project in Visual Studio, as we want to have an application with Graphical User Interface (GUI). Figure 2 shows us how to do this. We use the File->New->Project... menu and choose Windows Forms Application from the list on the right panel.
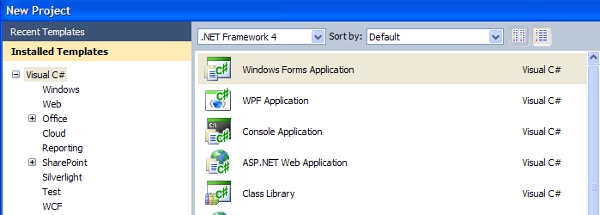
The bottom panel (Figure 3) gives us the opportunity to name our project and to change the project location folder.
Now let's rename our application to "SoftphoneExample" and keep the location, Visual Studio offered.

Step 2: Ozeki VoIP SIP SDK will do the hardest part for us
For accessing all the great support, we need to register the Ozeki VoIP SIP SDK to our project. After this simple step, we will be able to use all the methods of the SDK. That means, we won't have to implement a lot of difficult support methods, but we can use them by calling the provided methods.
If you have downloaded and installed the Ozeki VoIP SIP SDK, it is in the C:\Program Files folder. This is the location, where we will use the SDK from. Using an SDK means to register the SDK .dll file(s) to our project. This can be done on the Solution Explorer panel that is usually on the right side of the Visual Studio window.
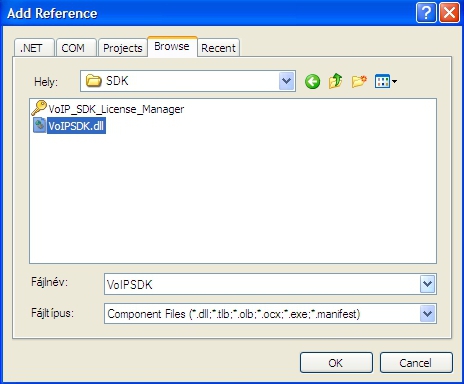
Figure 4 and Figure 5 show the method of registering the Ozeki VoIP SIP SDK to our project. First we should right click on the References label on the Solution Explorer panel and choose Add Reference... from the list (Figure 4), then, we should find the Ozeki VoIP SIP SDK dll in our file system with the pop-up window (Figure 5).
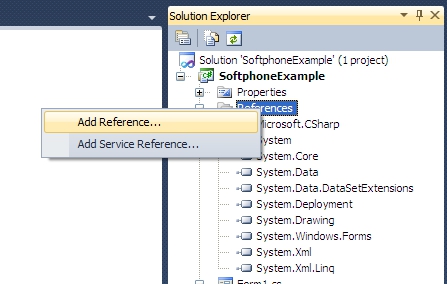
If you didn't change the target folder while installing the Ozeki VoIP SIP SDK, you will find the .dll file in "C:\Program Files\Ozeki\VoIP SIP SDK\SDK\" folder. Choose the "VoIPSDK.dll" file and press Enter or click the OK button (Figure 5).
Step 3: How does an effective Softphone look like?
We will need to create a useful GUI for our application. Windows Forms provide the easiest way to do this by drag and drop technology. Let's see what parts we will need and how we can modify them to match our needs.
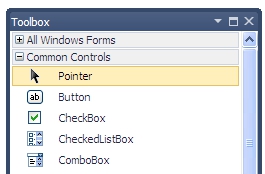
We use the Toolbox panel (Figure 6) to choose the GUI elements and we drag them onto the form.
After we dropped a GUI element onto the form, we can make some basic modification on it with the mouse. We can resize it or move it to the right place.
A GUI element has a great variety of properties that can be modified on the Properties panel. Normally, this panel is on the right side of the Visual Studio window, but if it isn't, we can open it with right clicking on the GUI element and choosing Properties from the pop-up list.
We can modify the selected GUI part's properties - to select a GUI element, click on it
with the left mouse button. The modifiable properties list depends on the selected GUI element.
In case of a button, we can for example modify the displayed text, the color scheme, etc.
Figure 7 shows the Properties panel of the button1 object.
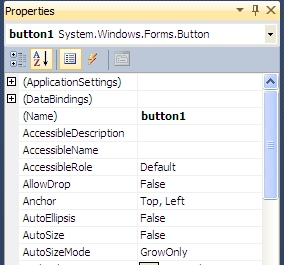
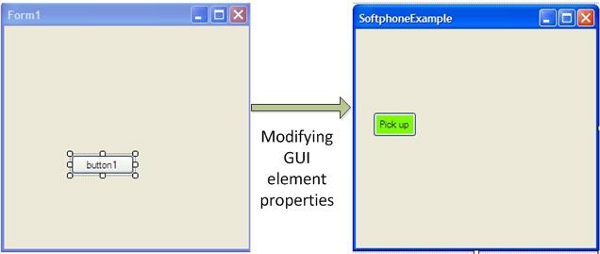
Figure 8 shows the result of setting the button1 Button object's BackColor and Text properties,
while moving it to the right place on the Form. The Text property of the main form has
been also modified.
Now the button is LawnGreen with the text Pick up, and the Window text is SoftphoneExample.
We can do similar changes on all GUI elements to create the exact look we want.
Now, we are familiar with the main activities we can do with the GUI elements, so it is time to create our impressive softphone GUI.
- The most essential part is the main window that contains all the other elements of the GUI.
When creating a Windows Form Application, we get a Form object that is our main window. We should resize it for the needed size to be able to contain all the other elements we want to put onto it. We also need to change the Text property to reflect the actual application.
We can use the mouse to resize the objects or modify the Size property on the Properties panel. Let our main window be 300x295 pixels. We already set the Text property to SoftphoneExample. - We will need some function buttons for picking up and hanging up the phone
Let's use two 60x30 pixels Button objects and change the Text and BackColor properties. Now, we have a main window with a LawnGreen "Pick up" and a LightCoral "Hang up" button as Figure 9 shows.
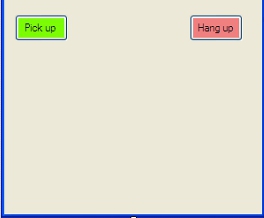
Figure 9 - After some property changes, we got our impressive function buttons - Naturally, we will have to add some essential numbered buttons
We can use some automatic guidelines for positioning the elements on the
form, as it is shown on Figure 10.
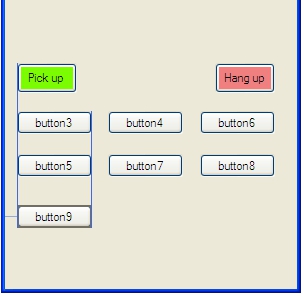
Figure 10 - Automatic guidelines help object positioning on the GUI - Having * and # buttons can be useful too
Telephone functions require the special * and # buttons, so we should add these too.
Make sure, you always modify the Text property of the buttons. The Name property seems to be the same, but if you modify that, the text on the button will not change.
Figure 11 shows the final keypad of our softphone. If we want to use other special functionalities, like recording or replaying voice, we will need other function buttons or menus, but for this example, this keypad will do.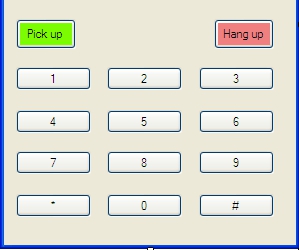
Figure 11 - This is the final keypad of our simple softphone application - We need some space to show the messages and the dialed numbers
Using a softphone has its advantages, like we can see the status messages or the dialed numbers on the application GUI. For this purpose, the simplest GUI element is a TextBox that can reflect all the messages, we will get. There are more sophisticated methods for this, but this example program only shows the basic possibilities.
Figure 12 shows the final version of our softphone example application, with all the buttons and the status textbox element.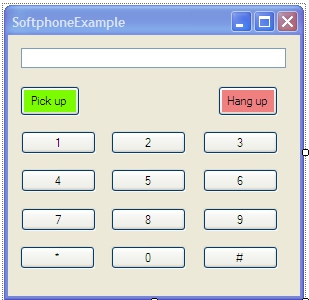
Figure 12 - The simplest workable softphone GUI ever
For a simple softphone application these GUI elements are enough to have. We can make more customized GUI later. Now we only want to create a simple example to understand the basics.
Now, we have the impressive and useful GUI for our softphone, it is time to do some programming. Don't worry, it won't hurt.
Step 4: Initializing the main parts
First of all, we need to get to the code. This is a simple thing, we only need to double click on the form, and Visual Studio will open the code for us.
There are some elements that have to be initialized for a softphone. Some of these ensure the connection to the PBX or the other client; others are for using the audio peripherals of the computer.
If we want to use the tools Ozeki VoIP SIP SDK offers, we will need to add some extra lines in the using section first. This will allow us to use the SDK elements as they were in the same namespace (Code 1).
The "using System" lines are created by the Visual Studio itself, we only need to add the "using Ozeki" lines into the code. Without these lines we would have to use the namespace information as a label for all tools of the SDK.
For example, without the "using Ozeki.VoIP.SDK;" line we have to refer to the "SoftPhoneFactory" name as "Ozeki.VoIP.SDK.SoftPhoneFactory", while with this single line added to the using section, we can simply use the name "SoftPhoneFactory", and the system will find the object definition for it.
using System;
using System.Collections.Generic;
using System.ComponentModel;
using System.Data;
using System.Drawing;
using System.Linq;
using System.Text;
using System.Windows.Forms;
//we need to add our using lines here
using Ozeki.Media;
using Ozeki.Media.MediaHandlers;
using Ozeki.Network.Nat;
using Ozeki.VoIP;
using Ozeki.VoIP.Media;
using Ozeki.VoIP.SDK;
using Ozeki.Media.MediaHandlers.Facade;
using Ozeki.Common;
Now we have to define the main tools for our softphone application. Every softphone needs to have some essential objects defined, as it is seen in Code 2.
- We have to ask for a softphone object
As you can see in Code 2, we need to get a softphone object from the SoftPhoneFactory class provided by Ozeki VoIP SIP SDK. We need to set the IP address and the port numbers we want to use for the communication. SoftPhoneFactory can get the local IP address with the GetLocalIP() method, so we use that.
As for the port numbers, we should add 3 port numbers, the first two defines the range start and end from which the softphone should use the port for sending messages, and the third one defines the port on which the softphone will listen.
- We need to be able to communicate with other networks too
We also have to set the Network Address Translation (NAT) traversal method. In this case we use the ICE method type.
The other three string parameters are the server address, the user name and the password. If you have these parameters specified by your provider, you can set it here.
Note that you have to use your own data to make the application work properly. - How do we notice an incoming call?
We have to register our softphone to the incoming call events, this is the 07 line in the code. This ensures that the softphone will be aware of the incoming calls.
- Now we can specify the information for the PBX
For communicating with a softphone, we will need a phone line, defined in the 08 line in Code 2. The phoneLine object needs the SIP account you got from your SIP provider. The parameters of the SIPAccount constructor can be set with the usernames and passwords your provider gave to you.
The first bool parameter shows if there is a need for the registration of the softphone before initiating the call.
Then you need to set some string parameters listed below.
Note that the example code shows sample data which will not work on your computers properly. Use your own data to fill these parameters.
The four string parameters are for- the name you want to display
- the username you got from your provider
- the register name
- the register password
Next you have to give the domain server host IP and the domain server port you want to use.
Note that the IP and port numbers are only for demonstration in this code, please use your own domain server host data to make your application work properly. - The last step is to register the state change
We have to sign up for the EventHandler that informs us when the line state changed. This is essential, as we want to know, for example, if the call ended. The last line in Code 2 gives us this possibility.
private void InitializeSoftPhone()
        try
        {
             softPhone = SoftPhoneFactory.CreateSoftPhone(SoftPhoneFactory.GetLocalIP(), 5700, 5750, 5700);
                softPhone.IncomingCall += new EventHandler<VoIPEventArgs<IPhoneCall>>(softPhone_IncomingCall);
                phoneLine = softPhone.CreatePhoneLine(new SIPAccount(true, "oz876", "oz876", "oz876", "oz876", "192.168.112.100", 5060), new NatConfiguration(NatTraversalMethod.None));
                phoneLine.PhoneLineStateChanged += new EventHandler<VoIPEventArgs<PhoneLineState>>(phoneLine_PhoneLineInformation);
Now we have set all the parameters needed, we can register our softphone to the specified PBX.
Step 5: How to register our softphone to the PBX
As we primarily specified the phone line and so the PBX, registering our softphone will only need one code line to add, as it is shown in Code 3.
softPhone.RegisterPhoneLine(phoneLine);
We also have to set some exception handling into the code. Now we will use a pop-up message window to show up if an Exception occurs. If you don't set the IP addresses, usernames or passwords correctly, this message box will start to complain (Check Code 4).
catch (Exception ex)
            {
                MessageBox.Show(String.Format("You didn't give your local IP adress, so the program won't run properly.\n {0}", ex.Message), string.Empty, MessageBoxButtons.OK,
                MessageBoxIcon.Error);

                var sb = new StringBuilder();
                sb.AppendLine("Some error happened.");
                sb.AppendLine();
                sb.AppendLine("Exception:");
                sb.AppendLine(ex.Message);
                sb.AppendLine();
                if (ex.InnerException != null)
                {
                    sb.AppendLine("Inner Exception:");
                    sb.AppendLine(ex.InnerException.Message);
                    sb.AppendLine();
                }
                sb.AppendLine("StackTrace:");
                sb.AppendLine(ex.StackTrace);

                MessageBox.Show(sb.ToString());
                }
You must agree, this is the easiest part of the programming. Now we have the basic settings, let's do the "hard work" by defining the actual working part of the softphone.
Step 6: Now we should define the SDK events
First we need to know what SDK events we want to cover. These events will to be handled
in single methods in the program.
Our softphone application will handle the following SDK events:
- We need to know if the registration to the line has been succeeded
We only have to start the registration process as a daemon thread in our application.
This thread constantly checks if the registration to the PBX is successful. The registration
status will be shown on the textBox GUI element. We always need a succeeded registration
to be able to start a call.
Code 5 shows the simple method for handling phone line information. It basically contains a single conditional instruction that checks the registration status in a background thread. When there is a change in the status, the Text property of textbox object will be changed according to the registration status.
private void phoneLine_PhoneLineInformation(object sender, VoIPEventArgs<PhoneLineState> e)
        {
            phoneLineInformation = e.Item;
            InvokeGUIThread(() =>
            {
                label2.Text = ((IPhoneLine)sender).SIPAccount.RegisterName;
                if (e.Item == PhoneLineState.RegistrationSucceeded)
                {
                   label3.Text = "Registration succeeded";
                   label1.Text = "Online";

                }
                else
                    label1.Text = e.Item.ToString();
            });
        }
Code 5 - A simple method for checking the phone line registration state After a successful registration, we will be able to make and receive calls. Now we need to write some methods for handling the incoming calls. We will cover the outgoing calls in another section, as they are connected to the keypad buttons.
- We have to be able to notice that there is an incoming call. For this purpose
we use a simple handler method shown in Code 6.
An incoming message is an event that is needed to notice with our softphone.
This simple method that also runs as a background thread uses the textbox on the
GUI to show that there is an incoming call. It also shows the source of the call.
This method does not answer the call, it is a matter of a keypad activity, and it only makes a notification to the user about the call.The inComingCall bool variable becomes true in case of an incoming call in this method. It is essential as the application will check this bool when the Pick Up button is pressed.
 private void softPhone_IncomingCall(object sender, VoIPEventArgs<IPhoneCall> e)
        {
            InvokeGUIThread(() =>
            {
                label1.Text = "Incoming call ";
                textBox1.Text += String.Format("from {0}", e.Item.DialInfo);
                call = e.Item;
                WireUpCallEvents();
                inComingCall = true;
            });
        }
Code 6 - A simple method for handling an incoming message The call itself has states that must be watched so the softphone can react to them properly. We can use another background thread for this purpose.
- It is time to handle the hardware
When using a softphone, there are some specific hardware devices that are in use. We want to use these devices properly, so we need to know when these should be started or stopped. The next code sections show how easy it is to handle these devices.
Figure 13 shows how you need to connect the audio and video tools when you want to make your softphone or videophone work.
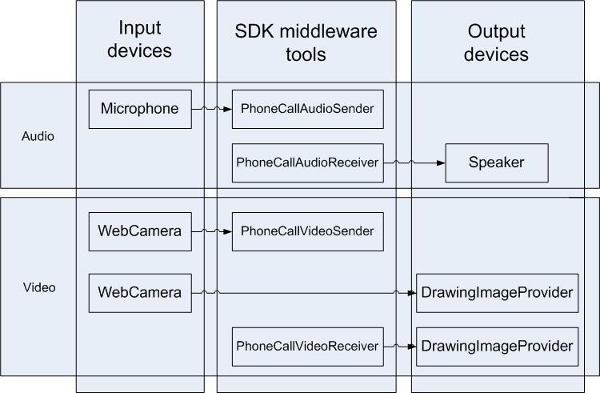
Figure 13 - The structure you need to set when connecting the MediaHandlers of Ozeki VoIP SIP SDK Code 7 contains the main concept of handling the call state change. The method starts a new background thread as all the listeners before. This thread will watch the CallState object and react to its changes.
In Code 7 we see that in case of an incoming call, we should start the microphone and connect it to the mediaSender object, as it will be the device through which we send the voice messages.
In case of an incoming call, we also need to start the receiver that is the speaker.
After starting these devices, we just attach them to the call and they are ready to use.
private void call_CallStateChanged(object sender, VoIPEventArgs<CallState> e)
        {
            InvokeGUIThread(() => { textBox1.Text = e.Item.ToString(); });

            switch (e.Item)
            {
                case CallState.InCall:
                    microphone.Start();
                    connector.Connect(microphone, mediaSender);

                    speaker.Start();
                    connector.Connect(mediaReceiver, speaker);

                    mediaSender.AttachToCall(call);
                    mediaReceiver.AttachToCall(call);

                    break;
Code 7 - We have to start the microphone and the speaker in case of an incoming call After finishing a call we need to stop the devices and detach them from the call object. We use the same method as for the incoming calls and write another case block to the switch instruction.
The finished call event has to change the textbox Text too, as the softphone user needs to be noticed about the end of the call.
case CallState.Completed:
    microphone.Stop();
    connector.Disconnect(microphone, mediaSender);

    speaker.Stop();
    connector.Disconnect(mediaReceiver, speaker);

    mediaSender.Detach();
    mediaReceiver.Detach();

    WireDownCallEvents();
    call = null;

    InvokeGUIThread(() => { textBox1.Text = string.Empty; });
    break;
Code 8 - After a call is finished, we need to stop the used devices We have to handle the case, when the call is not answered but cancelled. In this case we need to set the call object null to indicate that there is no communication.
Note that the call was set to null in case of the finished calls too.case CallState.Cancelled: WireDownCallEvents(); call = null; break; } }Code 9 - The simplest case is when we cancel the call - We can receive some special signals while using a softphone
During the calls, we can get some special signals through the line. These are called Dual-tone multi-frequency signals (DTMF), and they occur when some of the users press the numbered buttons while speaking. This can be familiar from analog telephones where we can hear the DTMF as beep sounds.
We can actually play the DTMF signals with the speaker, but in most cases we don't really want to hear some R2D2 language while speaking to somebody. In this case we can simply mask the signals or only show them on the textbox. The method in Code 10 does this last version.
We don't have to do much with DTMF signals as the Ozeki VoIP SIP SKD has the support for identifying them.private void call_DtmfReceived(object sender, VoIPEventArgs<DtmfInfo> e) { DtmfInfo dtmfInfo = e.Item; InvokeGUIThread(() => { label1.Text = String.Format("DTMF signal received: {0} ", dtmfInfo.Signal.Signal); }); }Code 10 - What can we do with the special signals? - We always have to prepare for unexpected events
Error handling is a very important part of every application, so do not forget to write an error handler method (Code 11).
private void call_CallErrorOccured(object sender, VoIPEventArgs<CallError> e)
{
    InvokeGUIThread(() =>
    {
        label1.Text = e.Item.ToString();
    });
}
Code 11 - Always expect the unexpected
Now we have all the listeners to handle every possible events for us. It is time to make some further coding to make our GUI do the right thing.
Step 7: How do we react when a button is pressed?
There are three types of keypad buttons on our current softphone, numeric buttons (including * and # buttons), Pick Up and Hang Up buttons. These cover three different activities, so we will use three methods to handle them. We will also use two other methods for DTMF signal sending.
We can attach an event handler to a button using the design view of the form. We only have to double click on the button and we will be directed to a newly created method for handling the default event of the button that is Click.
We can rename the handler method if the name is not good enough. Let's see how the Pick Up button handler works (Code 12).
The Pick Up button has dual functionality as it is the one we can initiate a call with and also the one to answer an incoming call. This method in Code 12 shows all the cases that can be occur when we press the Pick Up button.
In case of an incoming call (note that we set the inComingCall bool true in this case in the previous handler method), we answer the call with the Accept() method. The Accept() method is provided by the Ozeki VoIP SIP SDK, so we do not need to write it.
There are cases when pressing the Pick Up button will do nothing, as in cases of no incoming call or no dialed number.
When there is a problem with the registration phase, a message box appears to show the problem. This case occurs when the PBX is not active.
In case of a proper outgoing call, after a successful registration, the call is initialized, the event handlers are registered and we can use the Start() method of the call. This method is also provided by the Ozeki VoIP SIP SDK, so we can use it without further coding.
private void buttonPickUp_Click(object sender, EventArgs e)
{
    if (inComingCall)
    {
        inComingCall = false;
        call.Accept();
        return;
    }

    if (call != null)
        return;

    if (string.IsNullOrEmpty(textBox1.Text))
        return;

    if (phoneLineInformation != PhoneLineState.RegistrationSucceeded && phoneLineInformation != PhoneLineState.NoRegNeeded)
    {
        MessageBox.Show("Phone line state is not valid!");
        return;
    }

    call = softPhone.CreateCallObject(phoneLine, textBox1.Text);
    WireUpCallEvents();
    call.Start();
}
The Hang Up button works much easier that the Pick Up button. In this case we only have to
use this HangUp() method of the call object that is also the part of the Ozeki VoIP SIP SDK.
For working properly, we will also set the textbox Text to show nothing.
private void buttonHangUp_Click(object sender, EventArgs e)
{
   if (call != null)
    {
        if (inComingCall && call.CallState==CallState.Ringing)
            call.Reject();
        else
            call.HangUp();
        inComingCall = false;
        call = null;

    }
    textBox1.Text = string.Empty;
}
The numeric buttons can be treated in a special way. We certainly could write separate methods for all of them, but there is no need for that. We will write only one handler method and then we attach it to all numeric buttons on the form.
If we want to handle all the numeric buttons with one method, we need to get the button Text to identify the exact button. As we only need to show the pressed number on the textbox, we get the Text from the button and append it to the textbox's Text property.
private void buttonKeyPadButton_Click(object sender, EventArgs e)
{
    var btn = sender as Button;
    if (btn != null)
    {
        if (btn.Text == "0/+")
        {
            textBox1.Text += "0";
        }
        else
            textBox1.Text += btn.Text.Trim();
    }
}
If we used the previously mentioned method to attach the event handler to the button (double click on the button), we have one numeric button attached to this handler method. Now we need to attach the handler to the other numeric buttons.
We should go back to the Design tab and use the Properties panel to attach the handler. On the Properties panel we should click the icon with a lightning image on it. After this we can choose from the events of the button.
Find the Click event and left click on the blank cell next to it. A list will appear (Figure 14) and we can choose the handler method by left clicking on it. We should do this for all numeric buttons (and for * and # buttons too).
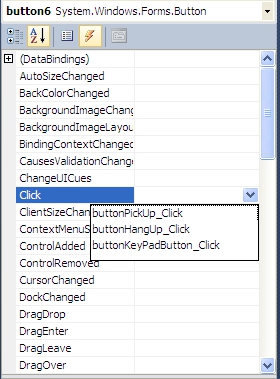
Now we have all the buttons attached to event handlers, there is not too much work left. We will need to write two more handlers and attach them to the buttons for the DTMF signals.
Step 8: How do we send DTMF signals during a call?
DTMF signals are made during the calls, when we press the numeric buttons. We distinguish the start and the end of a DTMF signal, and the signal lives between these two events.
The start of a DTMF signal is when we press down the button. Code 15 shows the method that handles that case. The Ozeki VoIP SDK contains all the needed support for these signals, so we only have to use the provided methods for this case.
This handler has to be attached to every numeric button (including * and # buttons) on the form. We will attach the method to the MouseDown event. It can be done the same way as in case of the previous methods.
private void buttonKeyPadButton_MouseDown(object sender, MouseEventArgs e)
{
    if (call != null && call.CallState == CallState.InCall)
    {
        var btn = sender as Button;
        if (btn != null)
        {
            int id;

            if (btn.Tag != null && int.TryParse(btn.Tag.ToString(), out id))
            {
                call.StartDTMFSignal((DtmfNamedEvents)id);
            }
        }
    }
}
The end of a DTMF signal occurs, when we release the button. This event is called MouseUp in C#, so we have to attach the following method (shown in Code 16) to the MouseUp event of all numeric buttons on the keypad.
The handler uses the StopDTMFSignal method provided by the Ozeki VoIP SIP SDK to stop the signal sending from the source. We do not have to do anything but call this method, and it will work properly.
private void buttonKeyPad_MouseUp(object sender, MouseEventArgs e)
{
    if (call != null && call.CallState == CallState.InCall)
    {
        var btn = sender as Button;
        if (btn != null)
        {
            int id;

            if (btn.Tag != null && int.TryParse(btn.Tag.ToString(), out id))
            {
                call.StopDTMFSignal((DtmfNamedEvents)id);
            }
        }
    }
}
We are almost there, just some helping methods to write and we will have our nice and shiny softphone application.
Step 9: We need to do things properly with signing up and down
There are two helping methods we used in the previously discussed code, now we will be sure they are written. These methods ensure the singing up and down to or from the necessary events of a call (Code 17).
private void WireUpCallEvents()
{
    call.CallStateChanged += (call_CallStateChanged);
    call.DtmfReceived += (call_DtmfReceived);
    call.CallErrorOccured += (call_CallErrorOccured);
}


private void WireDownCallEvents()
{
    if (call != null)
    {
        call.CallStateChanged -= (call_CallStateChanged);
        call.DtmfReceived -= (call_DtmfReceived);
        call.CallErrorOccured -= (call_CallErrorOccured);
    }

}
We used the InvokeGUIThread method for the event handlers before. Now we can see how simple it is to write (Code 18).
private void InvokeGUIThread(Action action)
        {
            Invoke(action);
        }
Step 10: Enjoy the result of our not at all hard work
Our softphone is now ready to use, let's see if it works properly. We will need two softphone clients run for testing. The PBX also has to be working to establish the connection.
Simply use the dialing buttons to call the other client. If you have followed the guide step by step and set all the needed information properly, your softphones will communicate with each other well.
Further development possibilities
This sample program is only for handling one telephone line. However, Ozeki VoIP SIP
SDK offers the opportunity to develop and handle multiple telephone lines
simultaneously. Further functions can also be implemented effectively like call forwarding
or chat function.
If you have any questions or need assistance, please
contact us at info@voip-sip-sdk.com
This page led you through the basic steps of building a software phone using
Ozeki VoIP SIP SDK. As the SDK itself provides a lot of support, the concrete
softphone building requires only some customizing and setup steps.
If you have followed our guide step by step, you have your first, fully operable
softphone application. Now, you can take a step forward and customize your
software phone for your taste.
Related pages
- How to build a softphone
- Quick start guide
- Download Ozeki VoIP SIP SDK form the Ozeki VoIP SIP SDK download page
- For further examples using Ozeki VoIP SIP SDK, visit the SIP voice applications
| Operating system: | Windows |
| Development environment: | Visual Studio |
| Programming language: | C#.NET |
| Supported .NET framework: | v4.8 |
| Software development kit: | Ozeki Voip-SIP SDK (Download) |
| VoIP connection: | 1 SIP account |
