How to setup Ozeki VoIP SIP SDK with Cisco Call Manager Express
This guide gives detailed instructions on how you can connect Ozeki VoIP SIP SDK with Cisco Call Manager Express, a small office PBX system developed by Cisco. Ozeki VoIP SIP SDK is fully compatible with this device. All solutions introduced on this website will work with Cisco Call Manager Express.
| We would like to thank Gloster Telekom, for providing us a Cisco Call Manager Express device for testing. |
 |
Cisco Call Manager Express is a VoIP solution developed by Cisco Systems. Cisco Call Manager Express supports the SIP protocol therefore you can use any kind of SIP desktop phone or softphone with it. After you have connected Ozeki VoIP SIP SDK to Cisco Call Manager Express, you can build your own application with voice and video support - it may be a standard softphone, an IVR system or a call center application.
System architecture
By following the configuration steps of this guide described below, you will have a telephone system managed by Cisco Call Manager Express, with at least one extension, and Ozeki VoIP SIP SDK softphone connected. After connecting various SIP endpoints to Cisco Call Manager Express, you can easily build various VoIP system infrastructures (Figure 1).

Configuration steps
Video: Cisco Call Manager Express setup
The first step you need to do is to configure your Cisco router running Cisco Call Manager Express on your network properly. You can connect your Cisco router via Console port (with a DB9 to RJ45 cable) or you can access the same console by telnetting into the router's IP address (Figure 2). After you have logged in you can start configuring the router, if you have sufficient privileges.
type ena and config t to enter terminal configuration mode (Figure 2).

At first, you need to configure the voice service (Figure 3). Type in the following:
router>ena
router#config t
router(config)#voice service voip
router(conf-voi-serv)#sip
router(conf-serv-sip)#registrar server
router(conf-serv-sip)#exit
router(conf-voi-serv)#exit
router(config)#
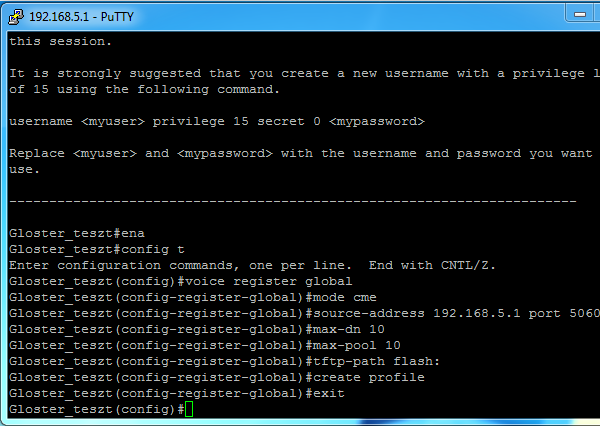
After you have enabled the SIP server, you need to enter the global configuration for SIP (Figure 4). The most important values for the configuration are the IP address of the service and the maximum number of registrations on your system. The service IP address must be your router's IP address. The standard port number for the SIP service is 5060.
router>ena
router#config t
router(config)#voice register global
router(config-register-global)#mode cme
router(config-register-global)#source-address 192.168.5.1 port 5060
router(config-register-global)#max-dn 10
router(config-register-global)#max-pool 10
router(config-register-global)#tftp-path flash:
router(config-register-global)#create profile
router(config-register-global)#exit
router(config)#

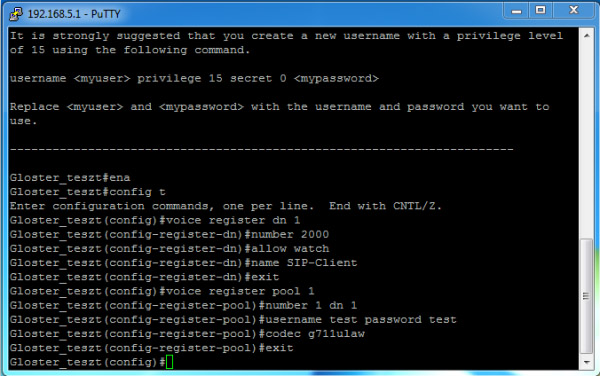
router>ena
router#config t
router(config)#voice register dn 1
router(config-register-dn)#number 2000
router(config-register-dn)#allow watch
router(config-register-dn)#name SIP-Client
router(config-register-dn)#exit
router(config)#voice register pool 1
router(config-register-pool)#number 1 dn 1
router(config-register-pool)#username test password test
router(config-register-pool)#codec g711ulaw
router(config-register-pool)#exit
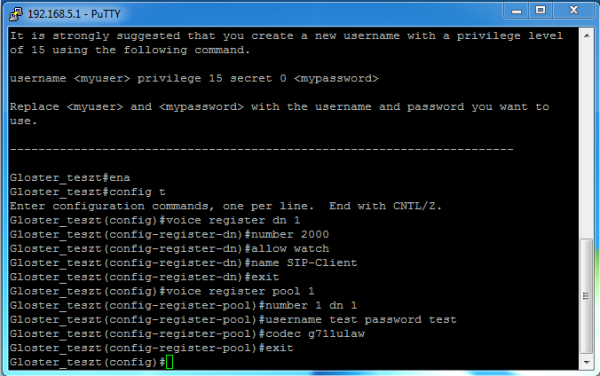
After setting these values you can register a SIP endpoint with the above name and password (test/test). The number of this SIP endpoint will be 2000, and it will use the G711 codec. By following the pattern above you can add as many SIP accounts you want.
Using the system
If you have set up everything properly, you can start registering your SIP endpoints to Cisco Call Manager Express by using the account data you added to it. Figure 6 shows the method of registering the Ozeki VoIP SIP SDK Demo softphone to Cisco Call Manager Express, with using the the above added account.
After you have your endpoints registered properly, you can use the system with all of the features provided by Ozeki VoIP SIP SDK like holding calls, blind transfer, attended transfer etc.
Conclusion
If you followed the steps of this page, you have a working system with Ozeki VoIP SIP SDK connected to Cisco Call Manager Express.
If you have any questions, do not hesitate to contact us at: info@voip-sip-sdk.com